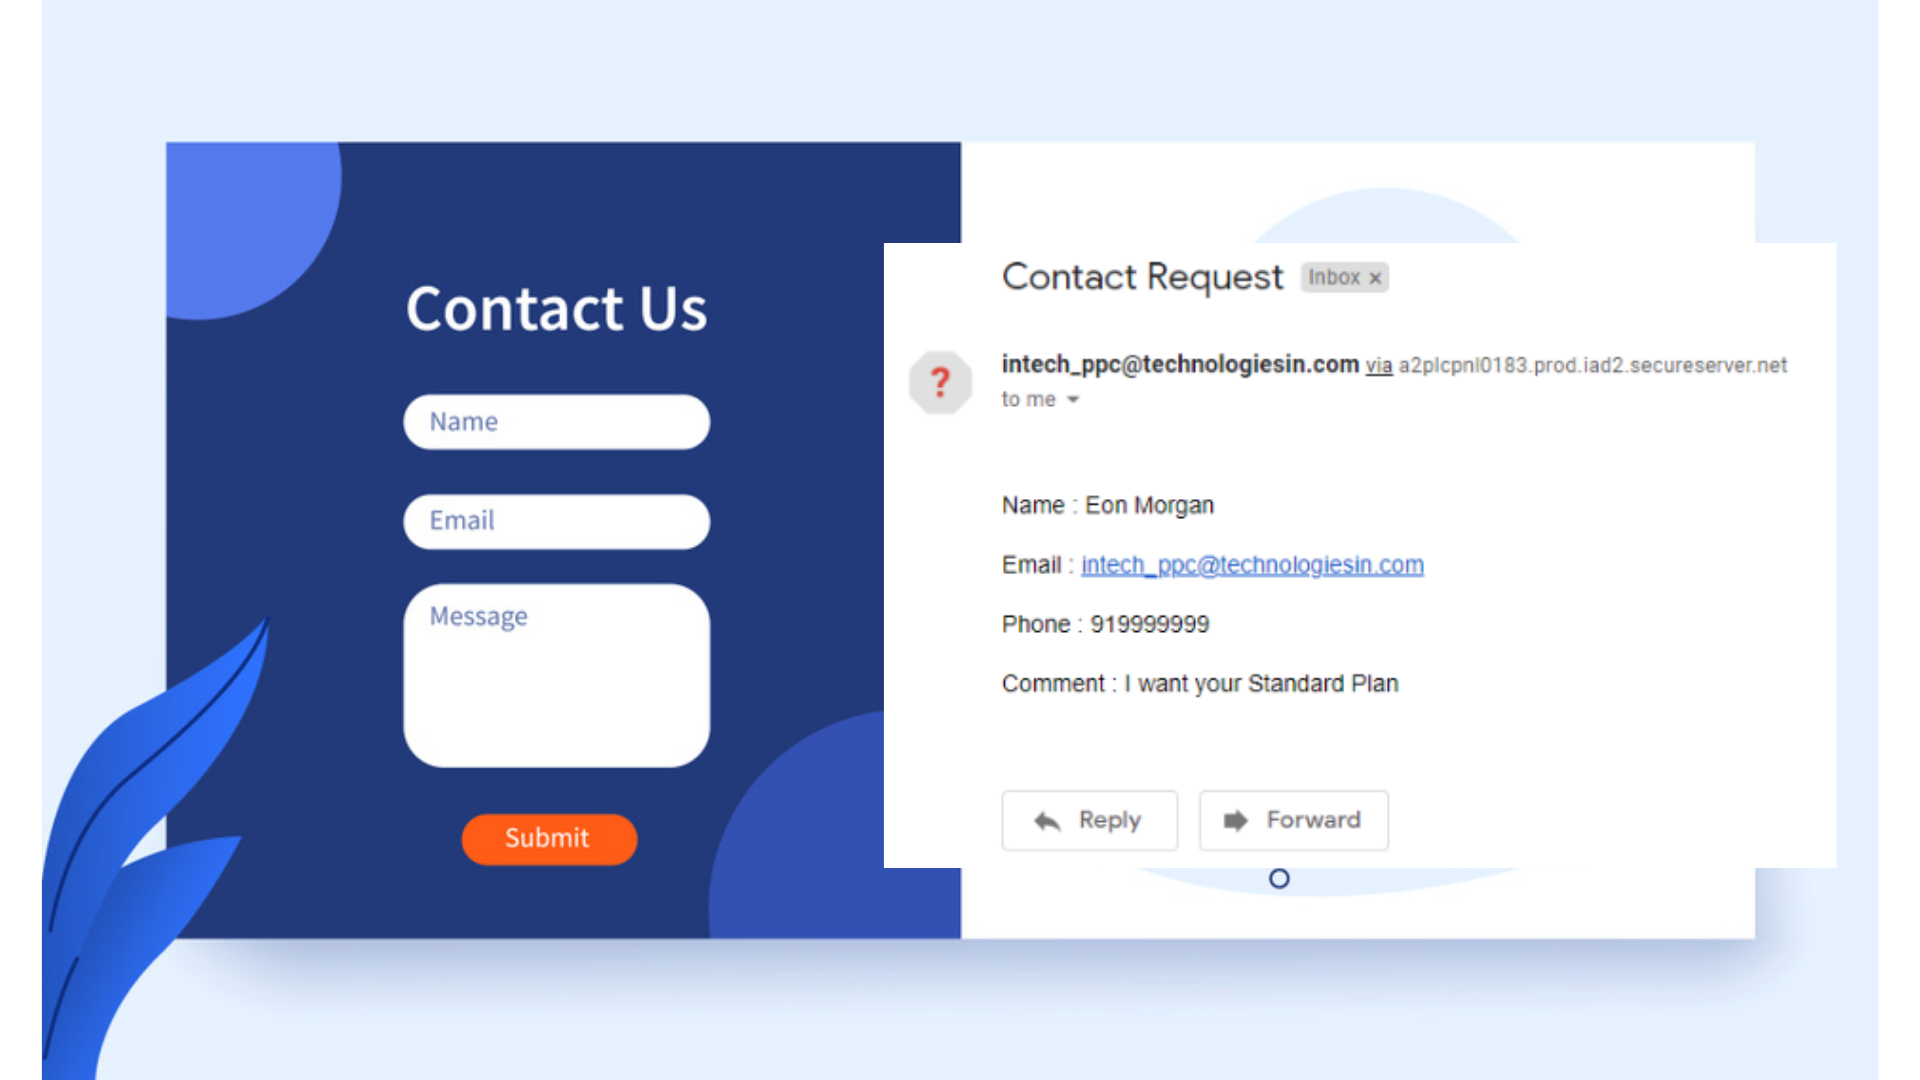
“A fully functioning or working contact form must need to have the validating feature where all the input fields must accept the required asked field only, like email asking field must accept the mail value only and the telephone field must need to have the numbered value, and etc. Also, as soon as the contact form is been filled by any user, automatically all his details or message must need to drop inside any creator’s designated mail address.
Somehow, to gain this functionality inside WordPress is not that hard, we just need to install some plugins and customize them, and all is done for us. In fact, we also have created a blog too where full contact form setup or ways we have explained through which:-
- you can validate and activate your contact form using the WPForms plugin- check the link- https://babacoder.com/blog/working-contact-form-through-wpforms-plugin-in-wordpress/
- you can validate and activate your contact form using the Contact Form 7 plugin- check the link- https://babacoder.com/blog/working-contact-form-through-contact-form7-plugin-in-wordpress/
Inside the above-mentioned blogs, we created the form and got successfully our mailing functionality, but our many readers have asked, or might some of you might get this issue too of not receiving emails after the form submission, and today will try to figure out the way through which we can able to receive emails.”
Reasons
Before knowing anything, you just need to be aware of the reasons, why this is happening or even completing every step, why the error is coming off, or still why you not receiving emails yet. So, there could have some possible reasons:-
- your purchased hosting server or any type of server may doesn’t allow it.
- multiple hosting providers don’t support the PHP mail function, or even if they support it, then they might keep off to this mailing settings.
Resolving Way
Resolving this mail functionality is the only motto this blog post has and this issue can solve in the following ways:-
- If you purchase any sustainable hosting then you won’t get this issue ever. If you planning to buy any hosting plans then on a very cost-efficient budget or at a discount price, you can purchase the hosting from Hostinger, Bluehost, HostWinds, Cloudways &, etc., automatically this issue will never come.
- You need to configure the Gmail SMTP or other SMTP where the mails, rather than going from your hosting provider mail, will send directly from your Gmail or other, etc.
This shifting of default PHP mail functioning to Gmail SMTP will work for every contact form plugin, whether you are using Contact Form 7, WPForms, etc. plugins. But after setting up this function, your mails will be forwarded through your Gmail account, rather than hosting mail.
In the following steps, we are explaining the ways by which you can opt-out of your hosting PHP default mail functioning to the Google Gmail SMTP (Simple Mail Transfer Protocol). And to conqueror this functionality we are taking the help of:-
- WP Mail SMTP Plugin– here we can opt for the Gmail SMTP functionality and also we get the Authorized redirect URLs from here, which we need to paste inside the Google Developer Console.
- Google Developer Console– it is a cloud platform that allows us to build, deploy, and scale applications, websites, and services on the same infrastructure as Google. And through here, we need to generate and access the Client Id and Client Secret key, which again we need to embed inside our WP Mail SMTP plugin.
I understood, might the above points are keeping you in a bit of confusion, but you don’t need to worry at all, as I am explaining every possible way below. So let’s understand the steps one by one:-
1. Go to the WordPress dashboard and access the Plugins section
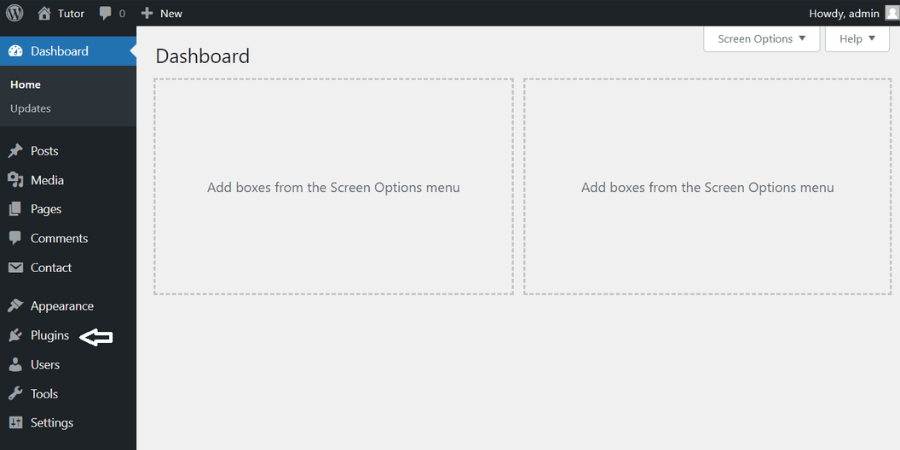
So, the very first step is to come inside your WordPress dashboard, and conqueror the Plugins section, as we need to add our new plugin here, named- WP Mail SMTP. Quickly, click on the Plugins tool or component inside your WordPress dashboard, as shown in the image too.
If you want to know, how you can able to install WordPress inside your hosting server, then you can take the help of our this post How to install WordPress inside the hosting server.
2. Click on the Add New button to successfully install the new plugin inside
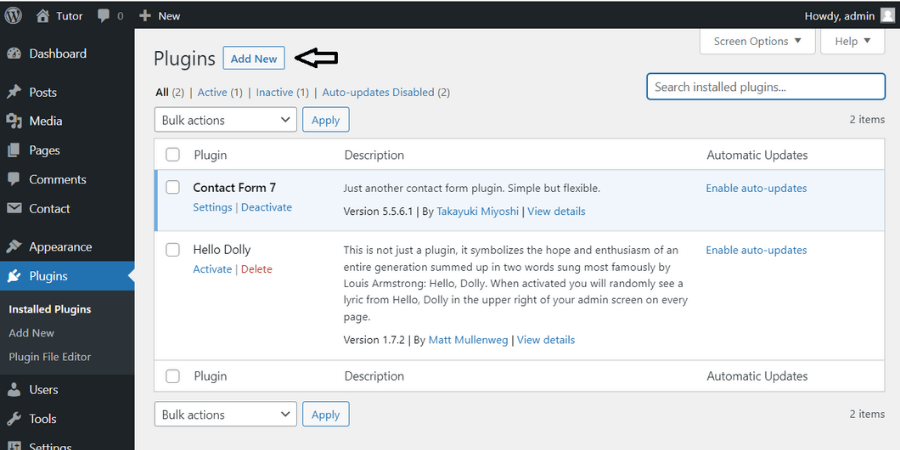
Inside the Plugins dashboard, now you need to click simply on the Add New button to add a new plugin here. Just click it.
3. Search for the WPForms Plugin and install it
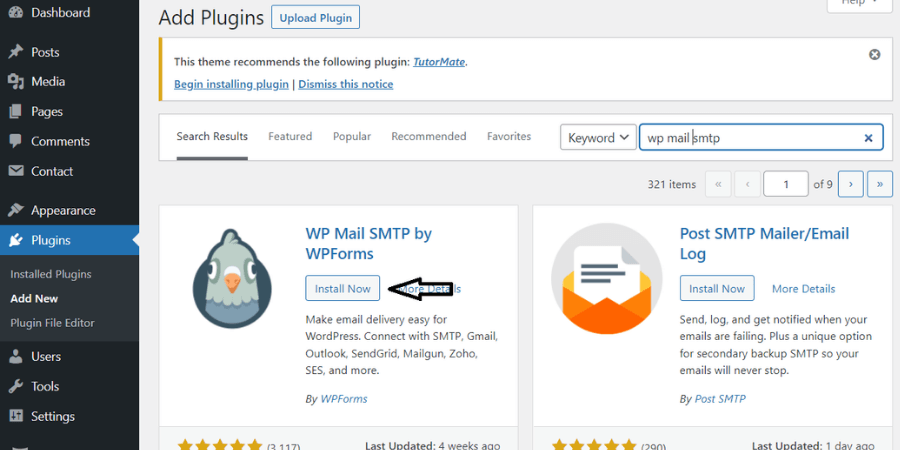
As soon as you click on the Add New button, you will be accessing different plugin search result pages. , inside the search bar, you need to type- ‘WP Mail SMTP’, as shown in the above image. Then, click on the Install Now button, to install or add this plugin.
4. Now, activate the successfully installed WPForms plugin
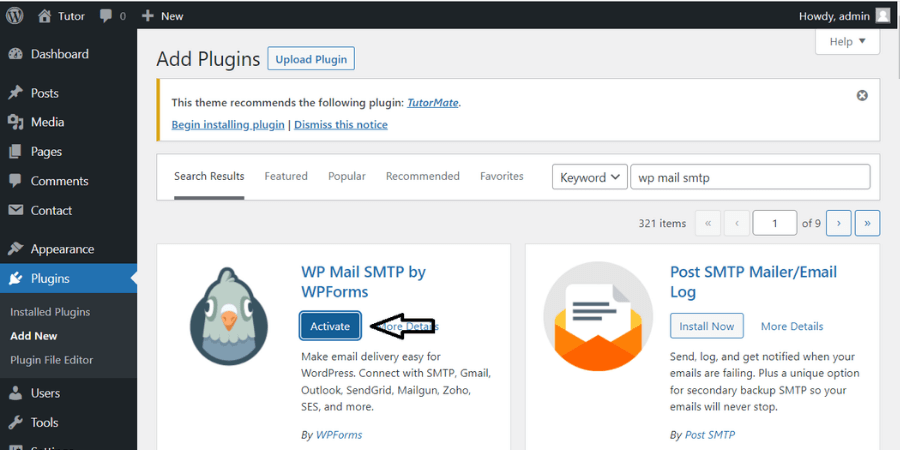
After the successful installation of this plugin, now you need to activate this plugin, so it can play its role. After clicking on the Activate button, you need to return back to your WordPress dashboard now.
5. Access the WP Mail SMTP menu or settings inside the WordPress dashboard
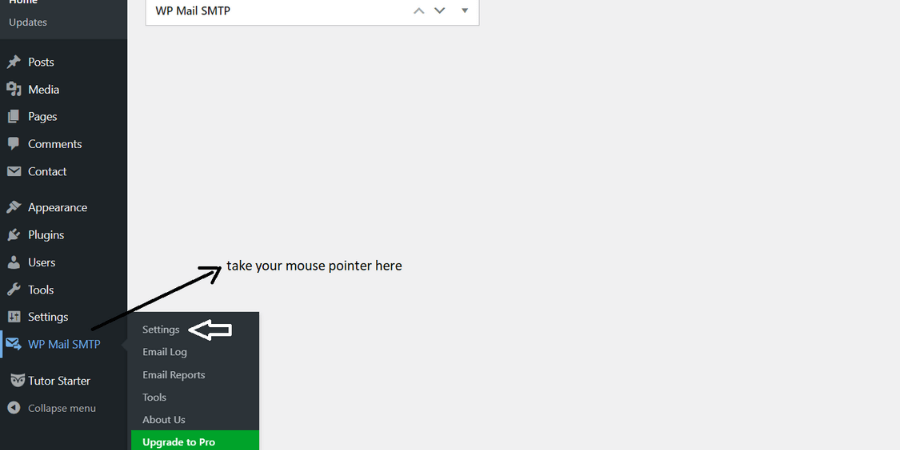
After the successful installation and activation of the WP Mail SMTP, plugin you need to return back to the WordPress dashboard, where you can able to find the WP Mail SMTP tool or component, as shown in the image too. You need to simply, take your mouse cursor over this WP Mail SMTP tool and it starts showing you its own different components like- Settings, EMail log, Email Reports, Tools, etc., you need to click on the Settings one.
6. Customize or confirm From email and From name
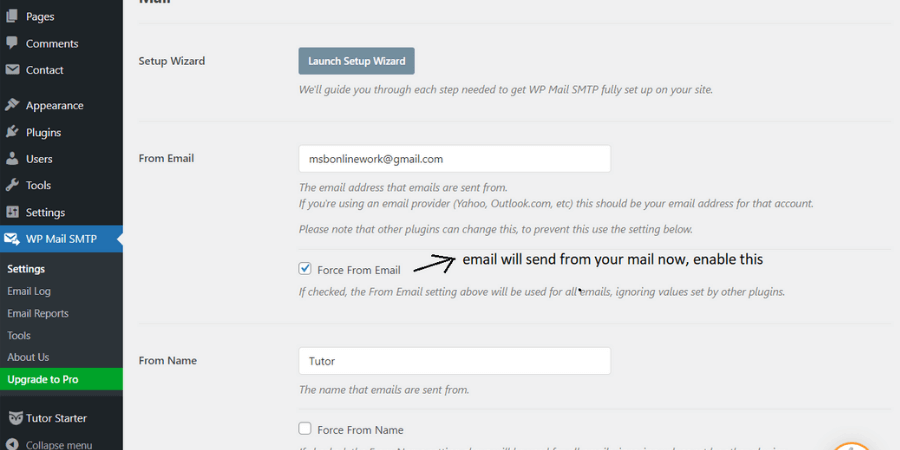
Here customize or confirm you’re From Email, From Name and etc., where:-
From Email– that email address from which the email will be sent.
From Name– that particular name that emails are sent from.
7. Uncheck the Default PHP mailer and switch it to Google / Gmail mailer
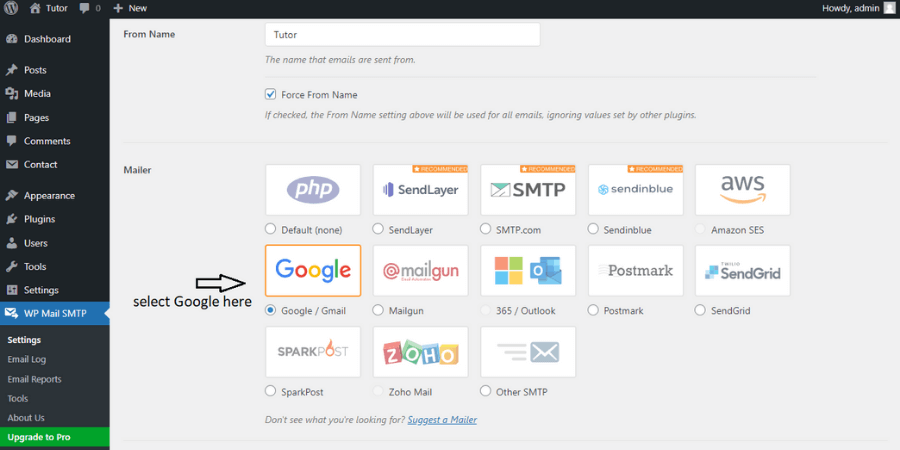
Scroll your page a little bit and you can able to access the Mailer settings. From here you can switch to other Mailer functionality as well. In our case, as we are about to use Google or Gmail mailing functionality, so we need to select Google/Gmail mailer.
8. Access the Client ID, Client Secret key, and Authorized redirect URL for now
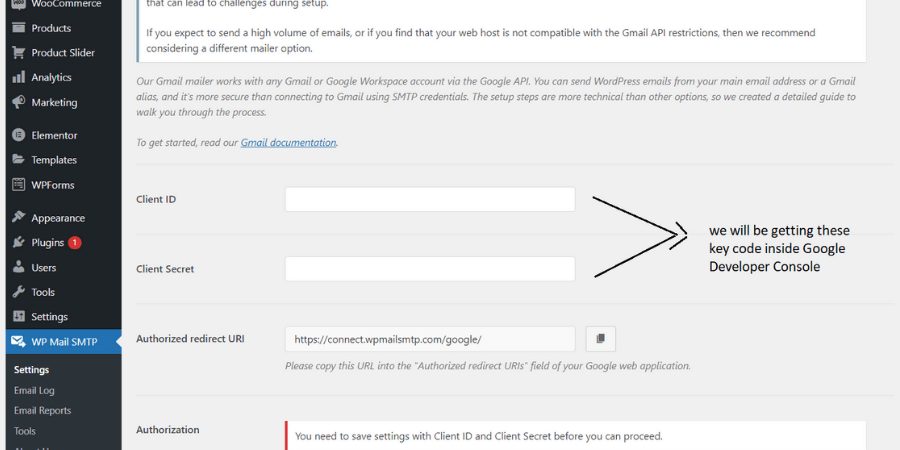
As soon as the Google / Gmail mailer has been checked, automatically it redirects to another page, where it is been asking us for the Client ID, and Client Secret key, which we going to get inside our Google Developer Console, and the Authorized redirect URL here, we need to paste it inside the Google Developer console. So leave this page here and you need to open Google Developer Console inside the new tab.
Don’t get confused about anything just follow the steps and all will be done.
9. Come to your Google search bar and search for Google Developer Console
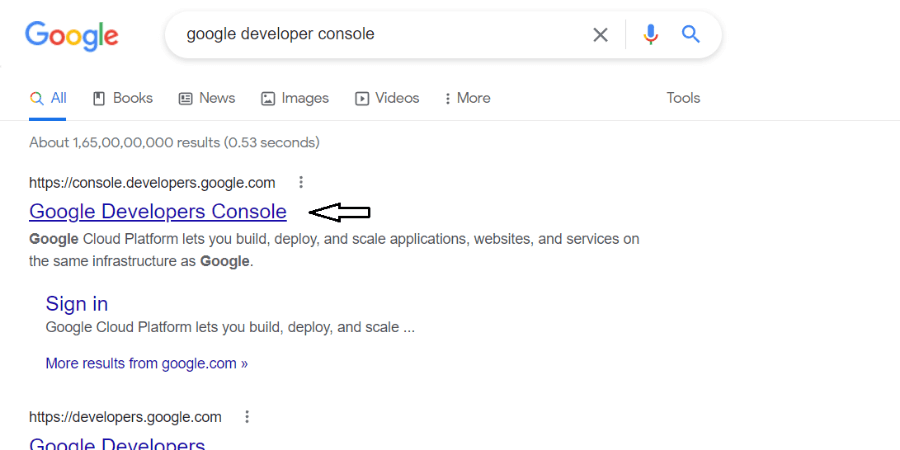
Inside, the Google Search bar, find Google Developer Console, a cloud platform, which allows space to build, deploy, and scale our applications or websites, etc. You must sign in inside Google before accessing this site, or you need to sign in from that particular mail, by which you want to get your mailing functionality to be done.
10. Create Project inside Enabled APIs & Services
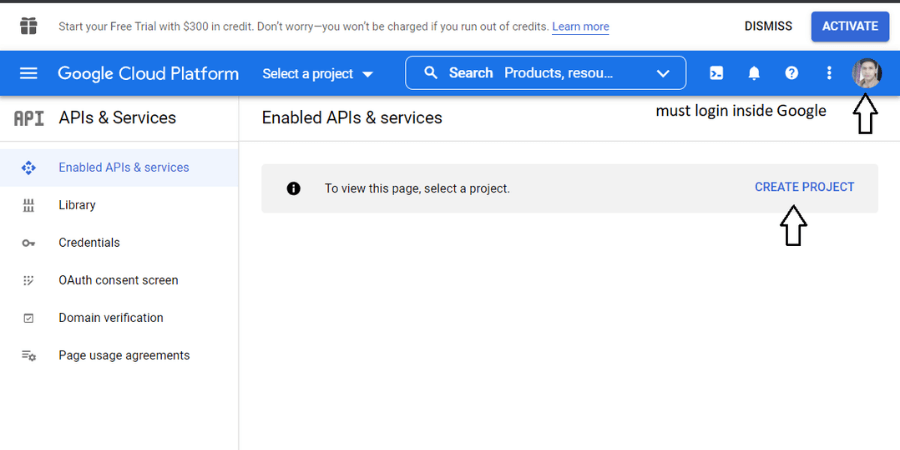
In our Google Developer Console, we can able to See the Create Project link inside the Enabled APIs & Services settings, we need to simply click on it.
11. Fill up your Project name and click on the create button
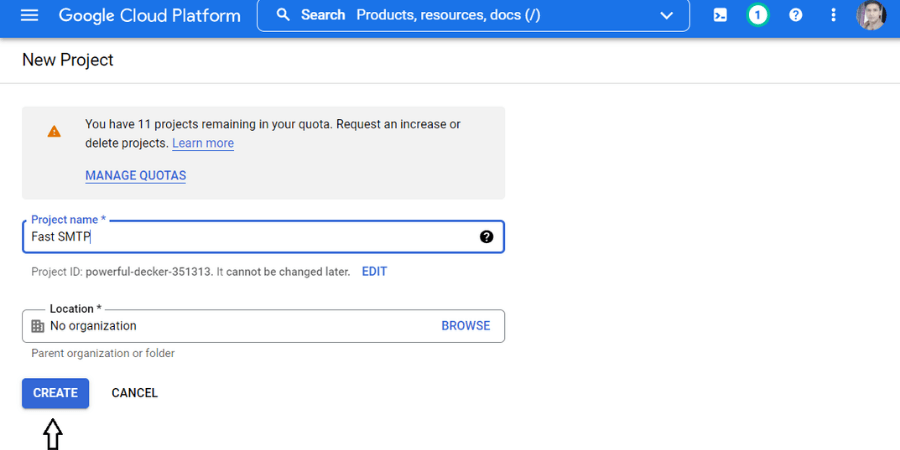
For successfully creating a project inside the Enabled APIs & Service settings, you need to specify a particular name for your project, here in my case I am keeping it as Fast SMTP, but it’s optional, you can keep another name as well, then click on the Create button.
12. Select your new designed project to enable Gmail API here
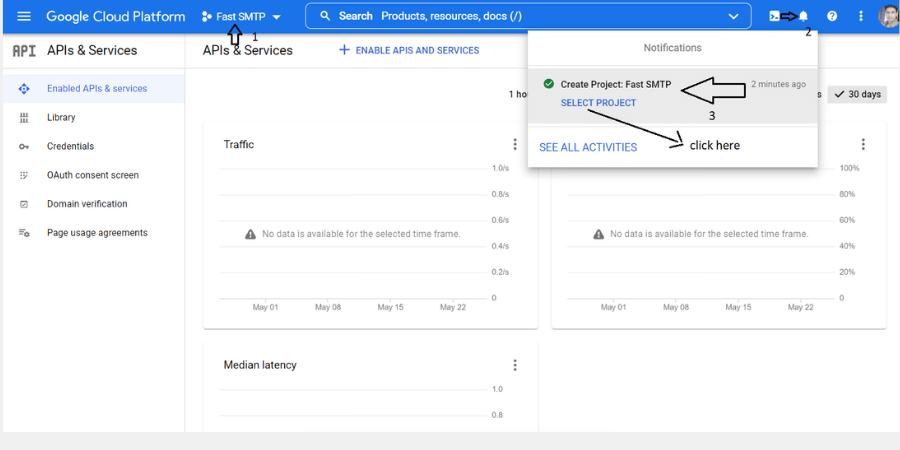
As soon as we are done with the creation of the project inside Enabled APIS and Services, a new page will come up. Here, inside the notifications bar, we need to select the project.
13. Now click on the Enable APIS and Services link inside your selected project
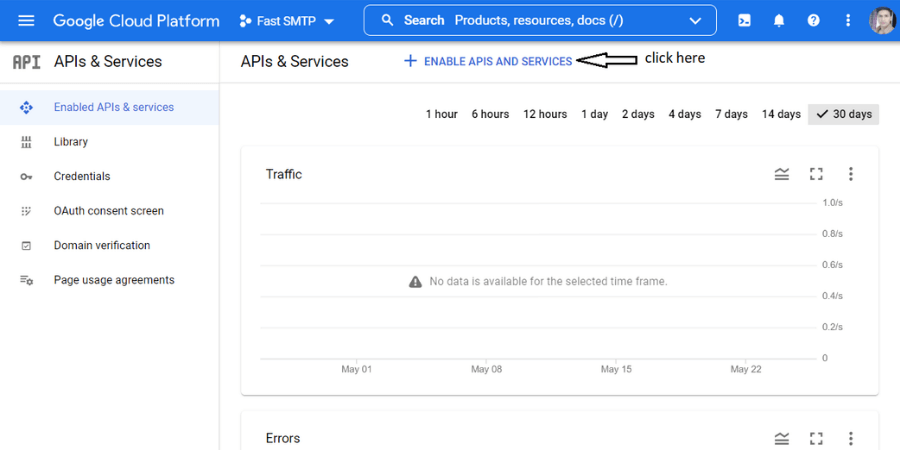
Inside your created project, simply click on the Enable APIs and Services link to add the Gmail API here, which you gonna be found at the top of the page.
14. Search for the Gmail API and click on there
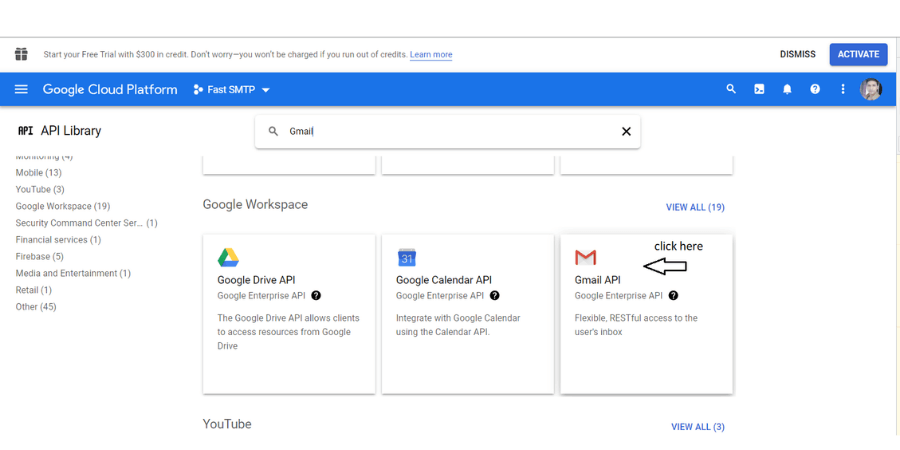
Here, just search for the Gmail API, and after finding this particular API card, click here to enable it.
15. Click on the Enable button to activate this Gmail API

Now, here you need to enable your Gmail API, which you can able to do by clicking on the Enable button. And, automatically the Gmail API will be added to your project.
16. Need to create credentials for the Gmail API
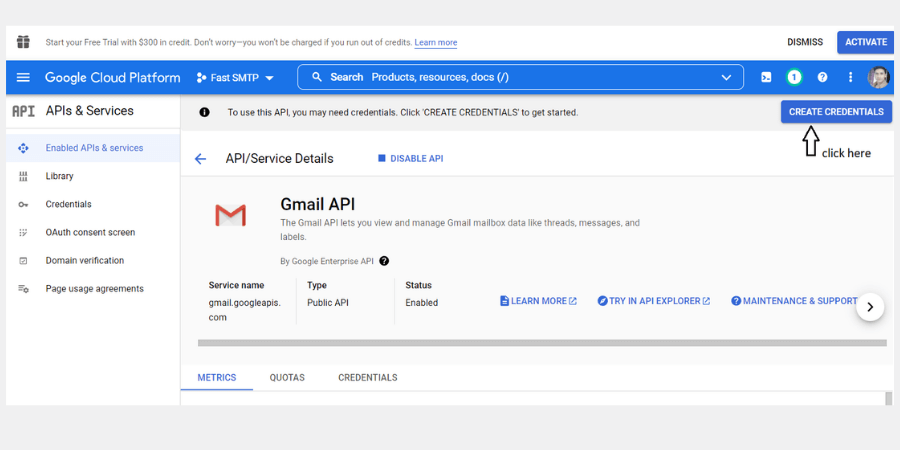
You need to further customize the Gmail API so that you can successfully publish the app and can able to find the client id key or client secret key.
17. Customize the Gmail API- Credential Type
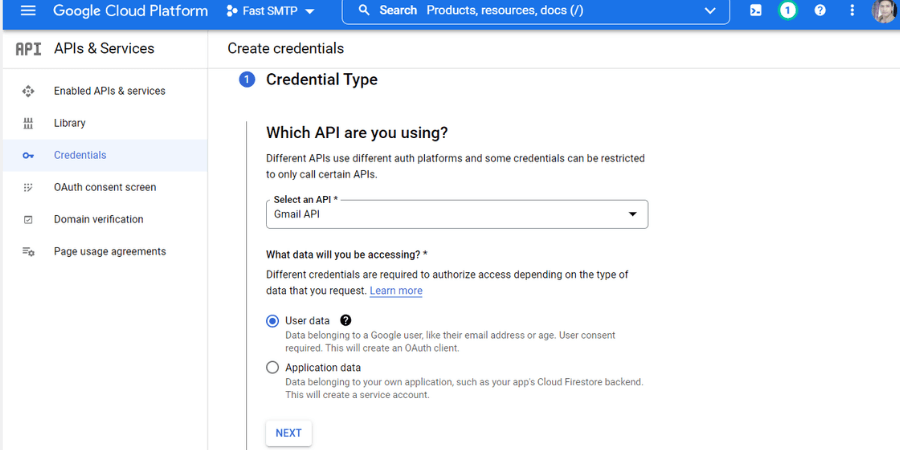
You need to play with the credentials part here, So select the Credentials option from the left-side link bar. Here, you need to customize more of your Gmail API, where inside the select an API box, Gmail API must need to be selected. Also, must check the User Data field too.
18. Customize the Gmail API- OAuth Consent Screen
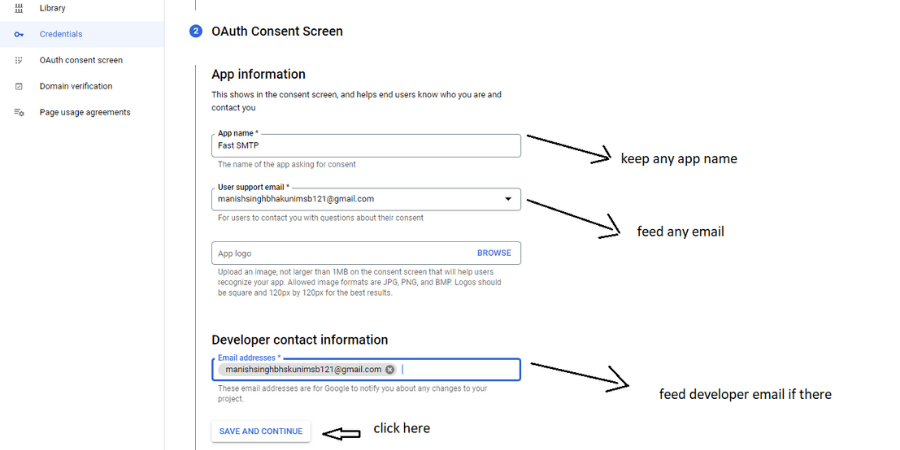
Here you need to submit your App information details, where you need to submit, your App name (in my case it is Fast SMTP), User support email, app logo (if you want), & developer mail address.
Don’t get confused by the App here, as very well we can apply this Gmail API, for our websites or web application.
19. Customize the Gmail API- OAuth Client ID
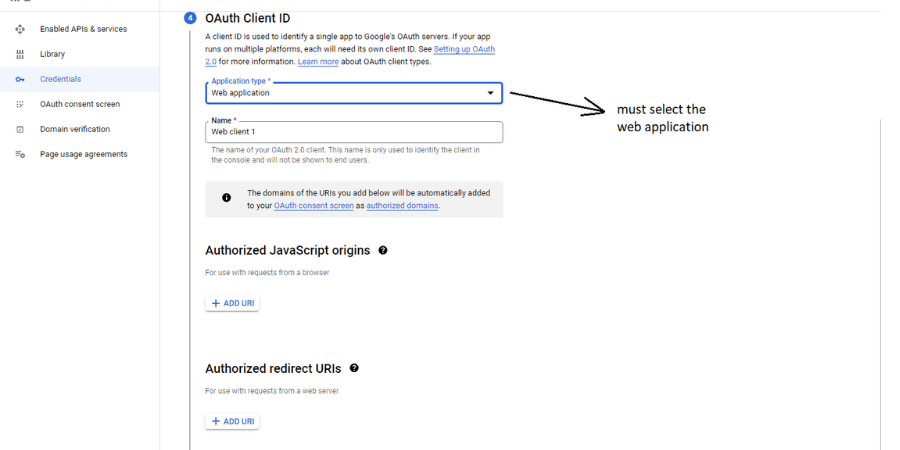
Here, you need to specify more about the application. So, inside the Application Type select box, select the Web Application.
As in my case my OAuth 2.0 client, the name is Web Client 1.
20. Customize the Gmail API- Authorized JavaScript origins
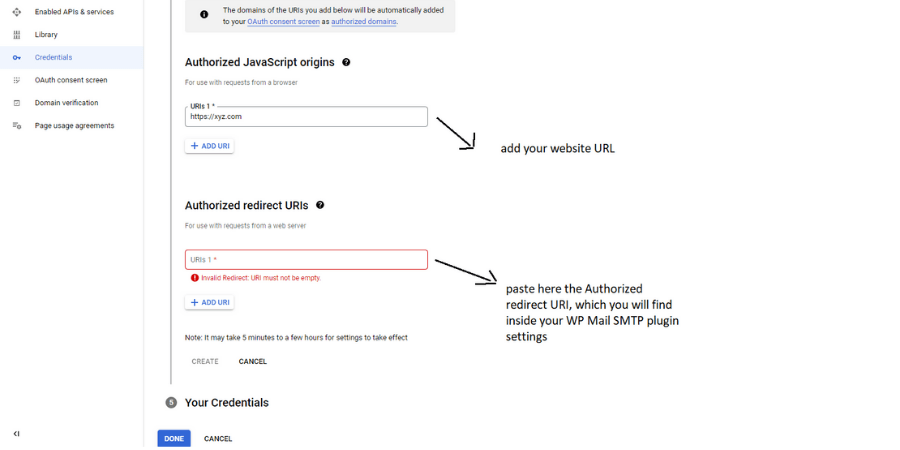
Inside or below the Authorized JavaScript origins, you will find an +Add URL button, here you need to add your website domain URL, which will be automatically added to your OAuth consent screen as an authorized domain.
Below Authorized JavaScript origins, you will find the Authorized redirect URLs heading or settings. And here you need to paste the Authorized redirect URLs, which you will find inside the WordPress Gmail SMTP plugin.
21. Get back to your WordPress dashboard and access the Authorized redirect URL
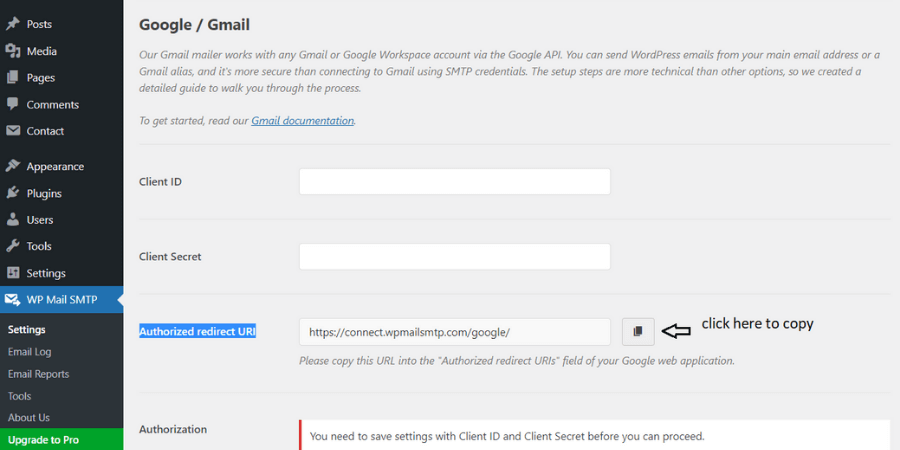
Now, where we left our WordPress dashboard inside the Gmail SMTP, we need to look back to it, as we will be able to find the Authorized redirect URL here. Below the Client ID and Client Secret field, you can able to access the Authorized redirect URL here. You need to simply copy this URL.
22. Paste the Authorized redirect URL inside the Google Developer console
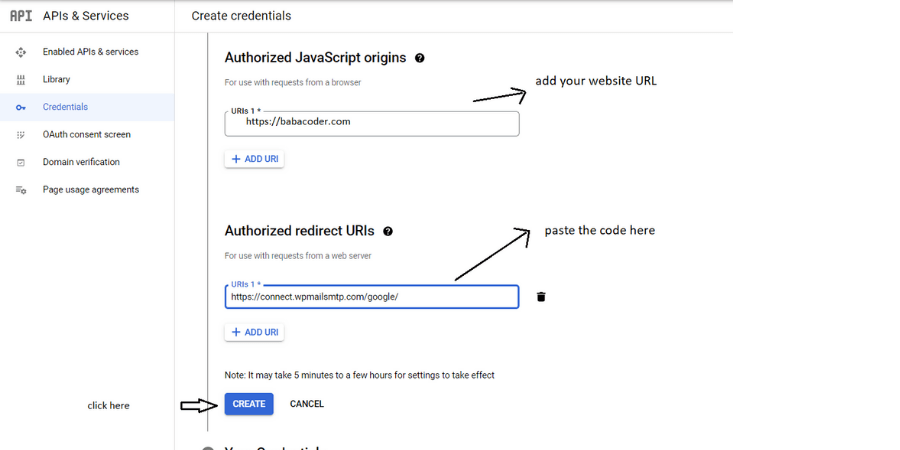
Again, you need to come back inside your Google Developer Console and here you need to paste the Authorized redirect URL link, which you have pasted from your WordPress Gmail SMTP plugin.
To add the URL click on the +Add URL and then paste the URL.
23. Download or skip the Client ID credentials and click on the Done button

You can also able to download your Gmail API credentials, which you can able to download inside the JSON format. But it’s up to you if you want to download it or not. Then simply click on the Done button.
24. Edit your OAuth 2.0 Client IDs in order to check out your Client ID and Client Secret key
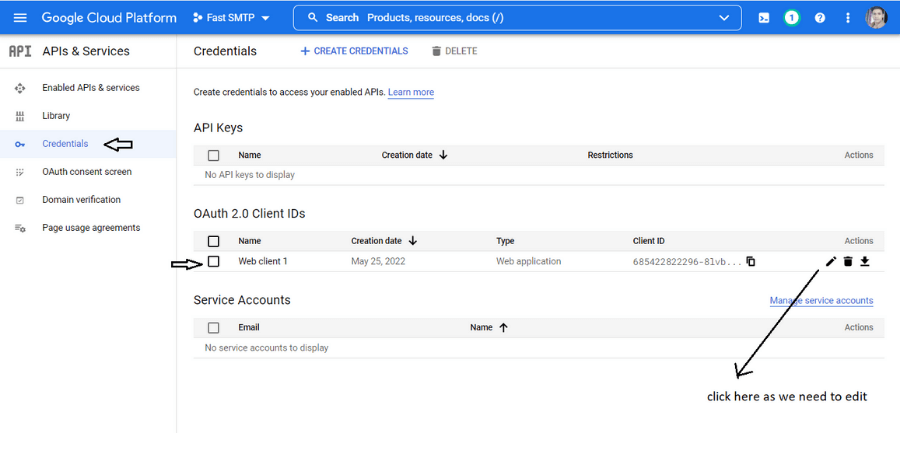
In order to check the Client ID & Client Secret key, you need to edit your client ID. So inside your client ID- click on the pencil icon to edit it, and automatically it redirects to another page.
25. Copy your Client ID and Client Secret key
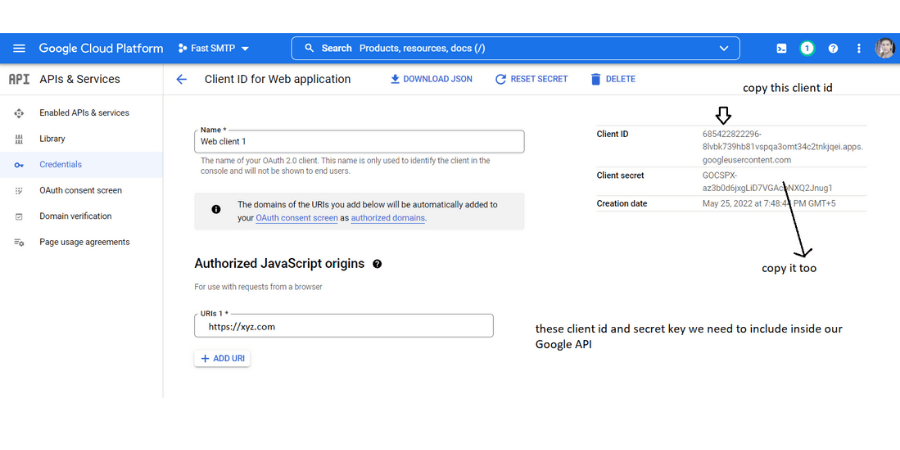
Here, on the right side of the page, you can get your particular Project Gmail API Client ID and Client Secret key. You need to copy both Client ID and Client Secret key here, as we need to paste it inside the WordPress Gmail SMTP plugin asking for the Client ID and Client Secret field.
To connect this Gmail API with our website, we need to embed this Client ID and Client Secret key.
26. Paste your Client ID and Client Secret key inside the WP Mail SMTP plugin
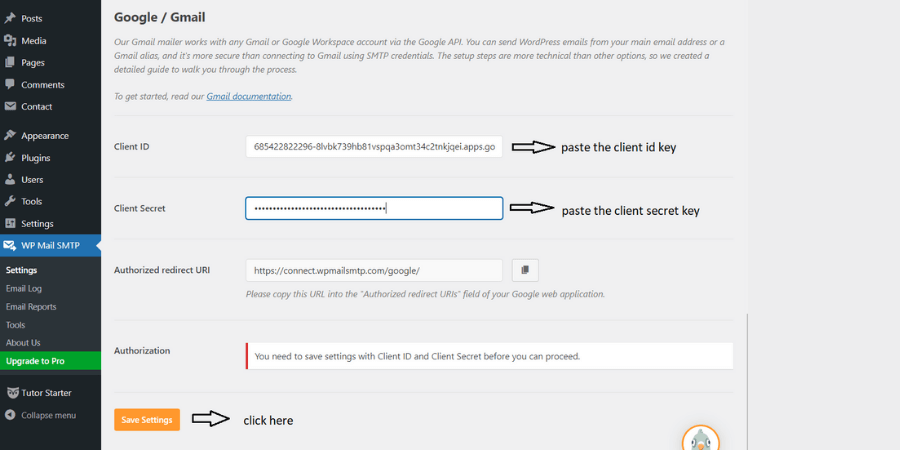
Again, we need to come back inside our WordPress dashboard. Inside the WP Mail SMTP plugin or above the Authorized redirect URL, you can find two blank boxes asking for Client ID and Client Secret key. So here you need to simply paste the respective key values, which you have copied from the Google Developer Console, and then click on the Save Settings.
27. Grab the OAuth consent screen settings and publish your app
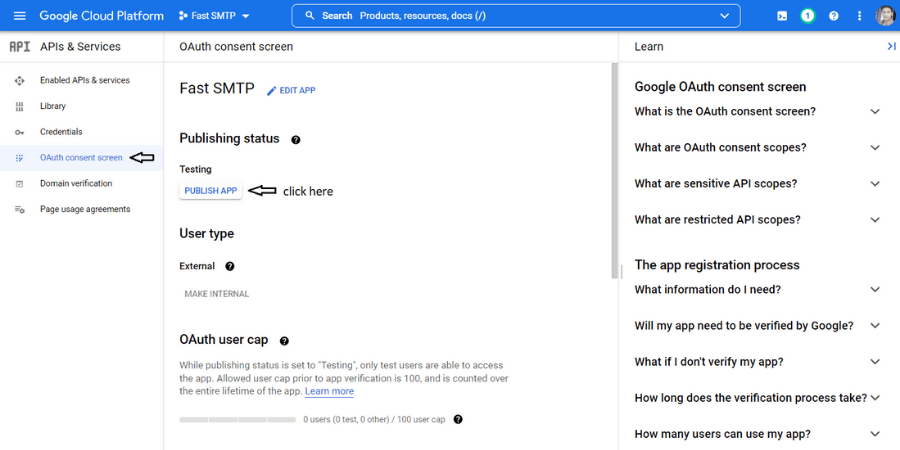
Now the final stage comes where you need to publish your App. And to publish this Gmail API Application or App, just grab the OAuth consent screen settings, from your left sidebar, and inside there you will be getting a Publish App button. Just click on it.
28. Confirm your Application to push for the production phase
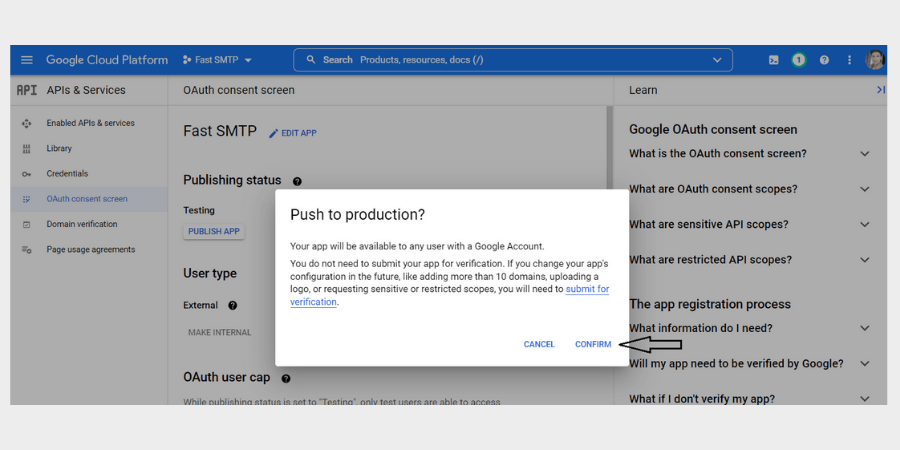
As, soon as you publish your application, it asks for the confirmation, of whether you want to push this application to the production phase, where you start getting emails from here, rather than your hosting mail, whenever any user fills up the form.
29. Allow your WordPress plugin too to send emails using your Google account
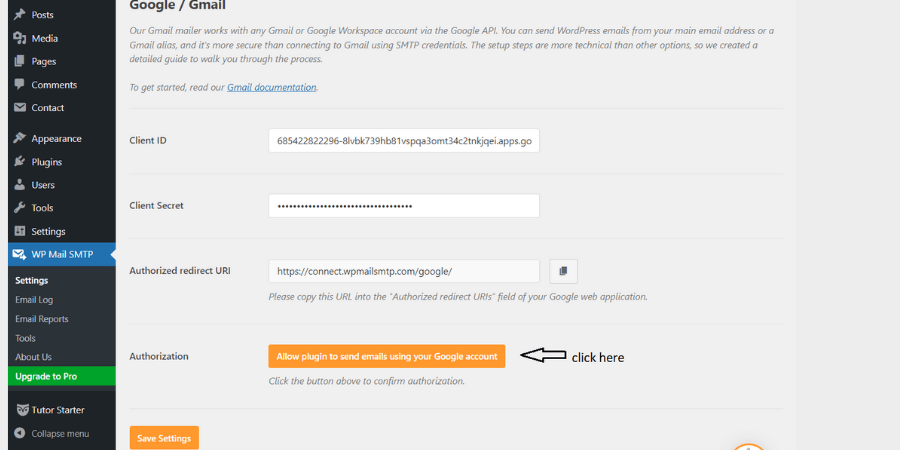
Inside, your WordPress, you need to allow the plugin to send emails using your Google account. Simply, click on the Allow plugin to send emails using your Google account button, also login to your Google account from here.
30. Login with the same Gmail account which you have used inside your Google Developer Console
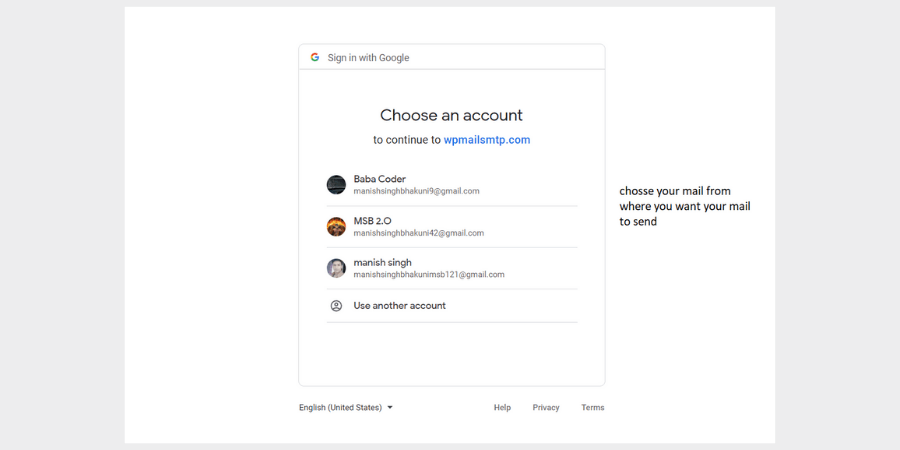
You need to log in with your Google account here, but keep in mind, that you should use that same Gmail or Google account, which you have used inside the Google Developer Console.
31. Proceed further and sign in with your Gmail account
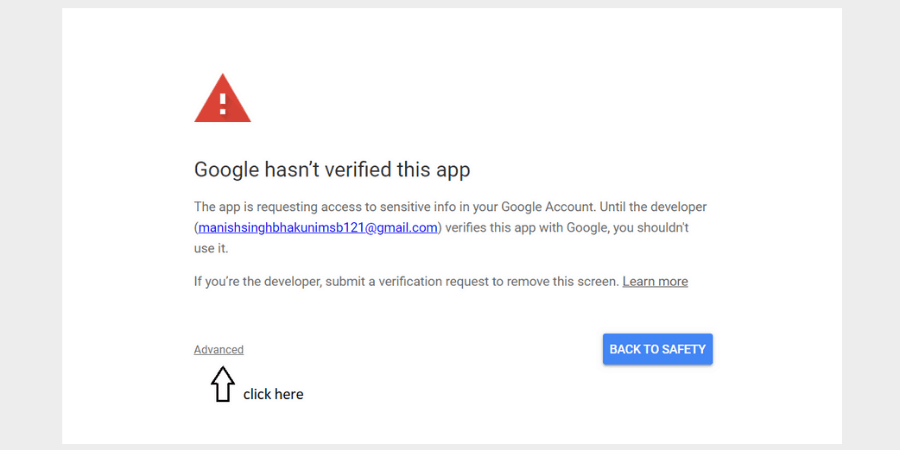
Maybe during the Sign-in process, you can get this Google unverified declaring box. You don’t need to worry about it, just click on the Advanced link.
32. Proceed further and click on Go to wpmailsmtp.com (unsafe)
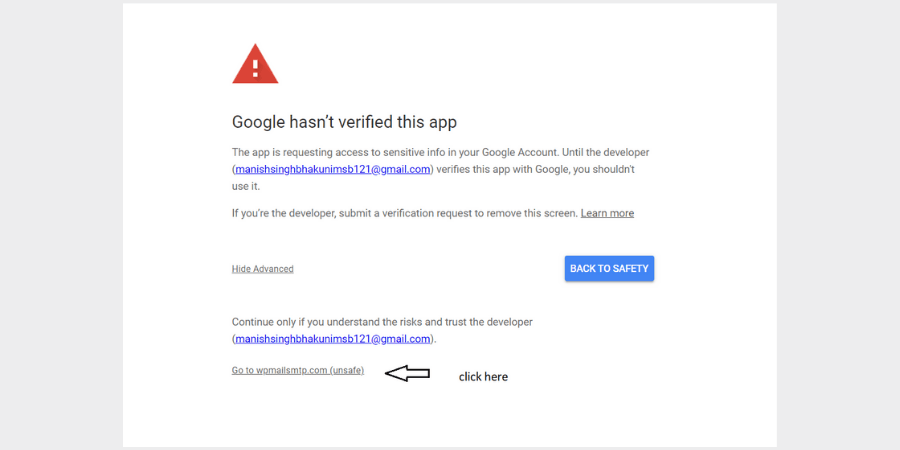
After clicking on the Advanced link, you will be getting another link- Go to wpmailsmtp.com (unsafe). You need to click over it to continue ahead
33. Confirm your Google or Gmail account to access from wpmailsmtp.com
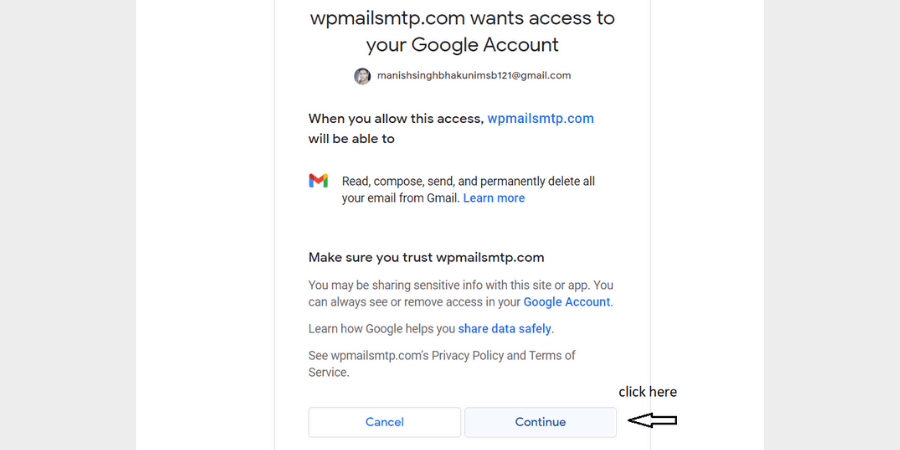
Click on the continue button, so that wpmailsmtp.com can access your Google or Gmail account.
34. Hey enjoy buddy we have done every step

As soon as we are done with every setting, automatically we get a success message, as shown in the image too.
35. Now check your contact form whether it is working or not

Till we have done everything, now it’s time to check the result. Fill up your website Contact Form and then click on the Submit button.
36. Change your thanking message after the form submitted
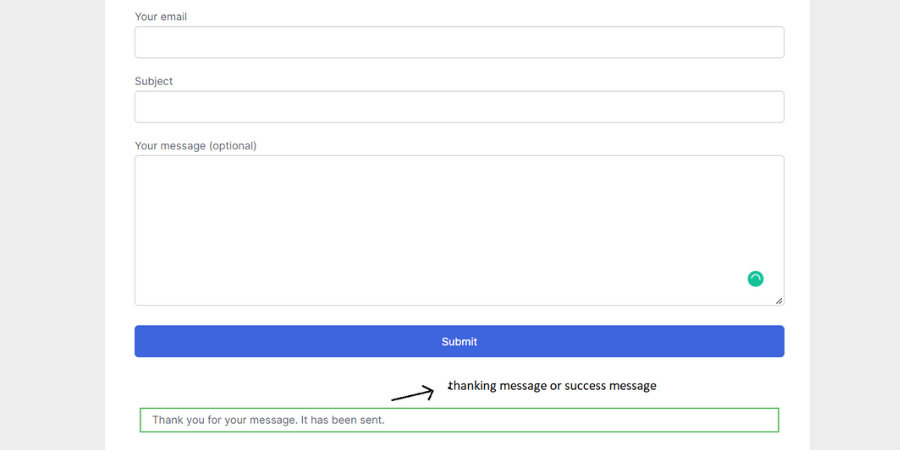
If the form has been submitted successfully then it must have the thanking or success message, so that the user could find out too, whether his queries or details are been submitted successfully or not.
37. Now check out your mailbox
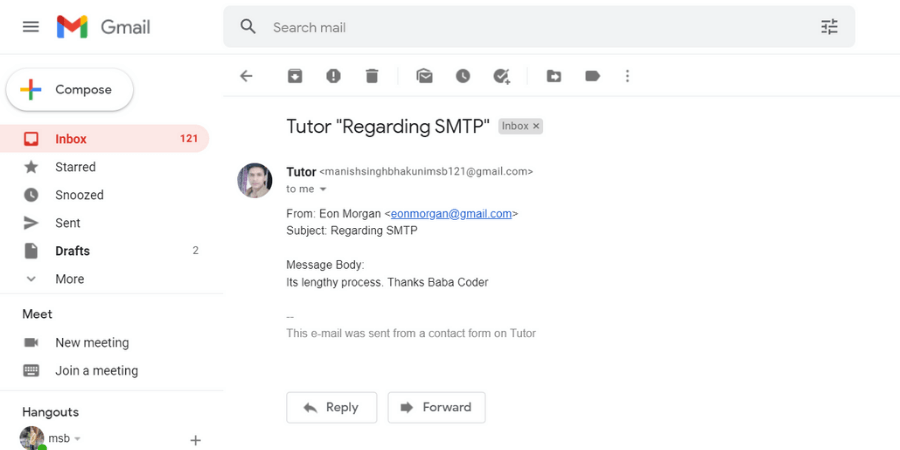
Now, you need to check for the mailbox, where your Form details are going to drop. As in my case, I am getting every bit of message successfully inside the mailbox, and if you have followed our every step, then definitely you too are about to get the mails or your contact form mailing functionality been resolved too, in this way.
Conclusion-
So, above in this post, we have understood the reasons why our contact form fails in sending the user detailing mails and the ways by which we can resolve this sort of issue. If you too have queries now then feel free to comment down below.
Also, if you don’t want to have these sorts of mailing functionality issues, then you must need to opt for the best hosting plans and you can able to purchase the cost-efficient hosting plans from our link too- Hostinger, Bluehost, HostWinds, Cloudways &, you can avail up to 40% discount here.


