“Chatbot or Chatbox is just been a messaging box, where you and your user can able to directly communicate with each other, same as you chat with your friends or girlfriends, etc. in Facebook, WhatsApp, etc. But as we are placing this chatbot inside our website, so it going to be more professional too.
Chatbot generally is the fastest way by which you can able to solve your reader’s or customer query. And chatbots like- WhatsApp, Facebook, Tawk, etc. are more reliable and fast methods too. And here you can able to communicate with your customers or readers in real-time.
You can able to place or integrate any chatbot or chatbox, just you need to have any website. If you are having a website then it’s very good but if you too are planning to launch your own website, must check these respective popular, powerful hosting provider links- Hostinger, Bluehost, HostGator, WPX, WP Engine, HostWinds, etc. And through these links, you can avail up to a 40% discount.
In our previous post, we have also discussed every step too by which you can able to place your WhatsApp chatbot inside the custom-designed as well as the WordPress-designed websites. You can able to find this post here- WhatsApp chatbot integration inside custom-designed or WordPress websites. Also, we discussed the ways by which you can able to place the Tawk chatbot inside the custom-designed as well as the WordPress-designed websites, you can find it inside this post- Live Chatbot integration inside custom-designed or WordPress websites.
And today in this post, we are going to explain step-by-step the procedure by which you can able to place the Facebook or Messenger script or chatbot inside any custom-coded website (HTML, CSS & JavaScript, etc.) as well as on any WordPress website, and yes, of course, it is totally been the free service.
But keep in mind that you need to have a Facebook page too, which you further can embed inside your website, and Facebook page creation is as simple as filling up any form. So let’s start:-“
1. Access your Facebook account and your Facebook Page
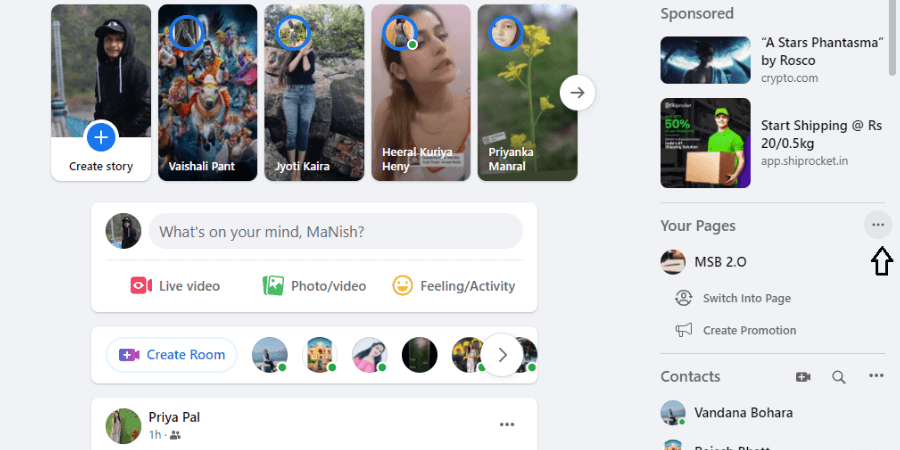
You need to access your Facebook account first. Just go through the official website- https://fb.com/ and access your account. And then you need to find your pages, you may get it inside your profile.
2. Select your Facebook Page
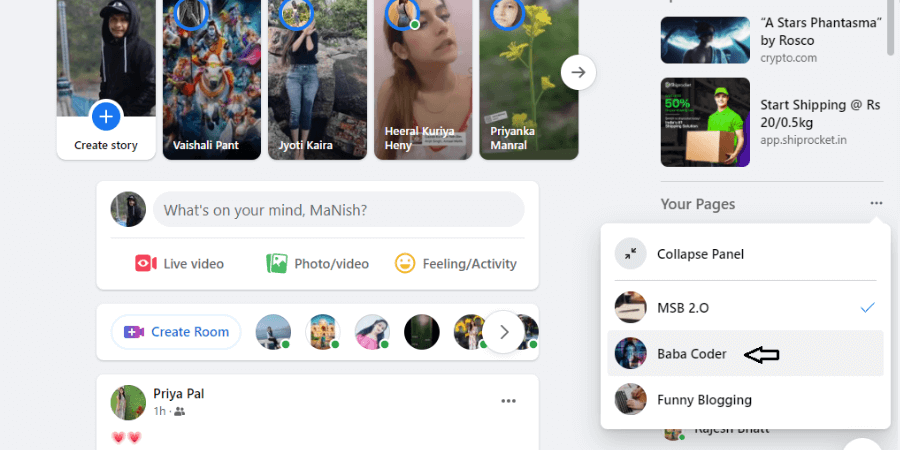
You need to access now your required Facebook page, which you want to embed inside the website too. As in my case, I am selecting the Baba Coder here.
3. Access your required Facebook page
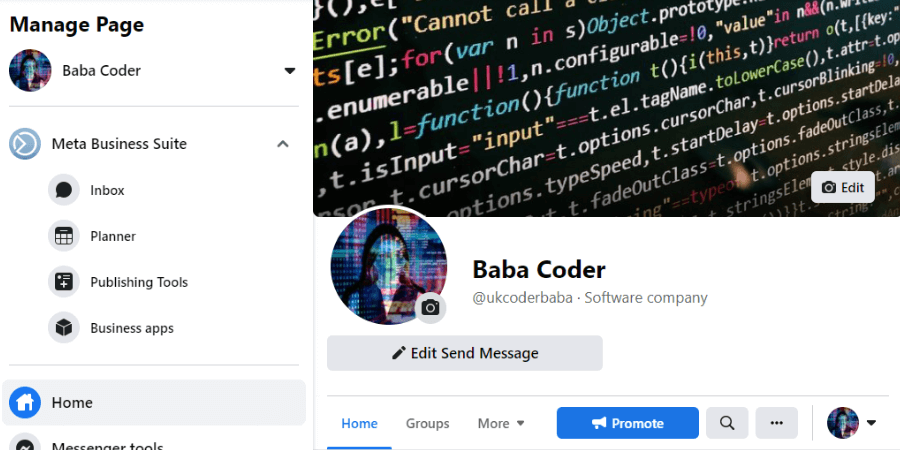
As soon as I am clicking on my desired page, I will be able to access the page main dashboard, wherein the left sidebar I am getting different tools or settings for my page, I also can able to post inside the page, and many other settings or components I can conquer now.
4. Now I need to find the Page settings or component
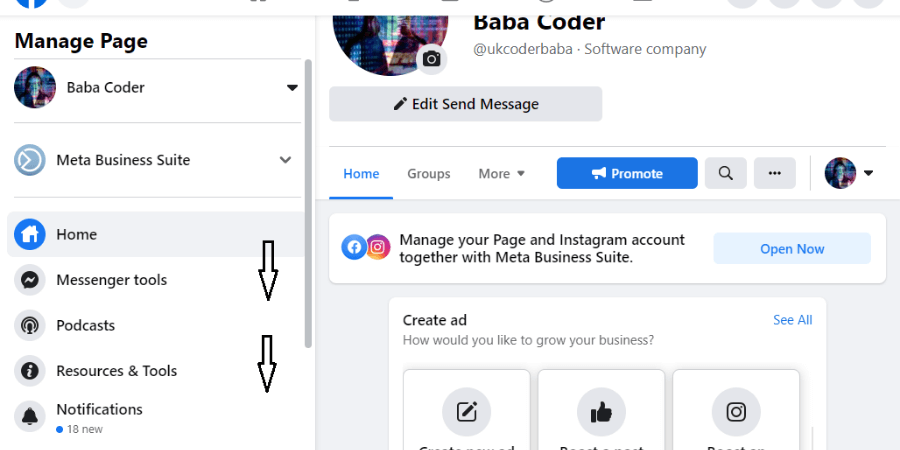
As, on the left sidebar, we are getting our different page components, we need to slightly scroll it and need to find our Page Settings.
5. Click on the Settings to configure your Facebook Settings
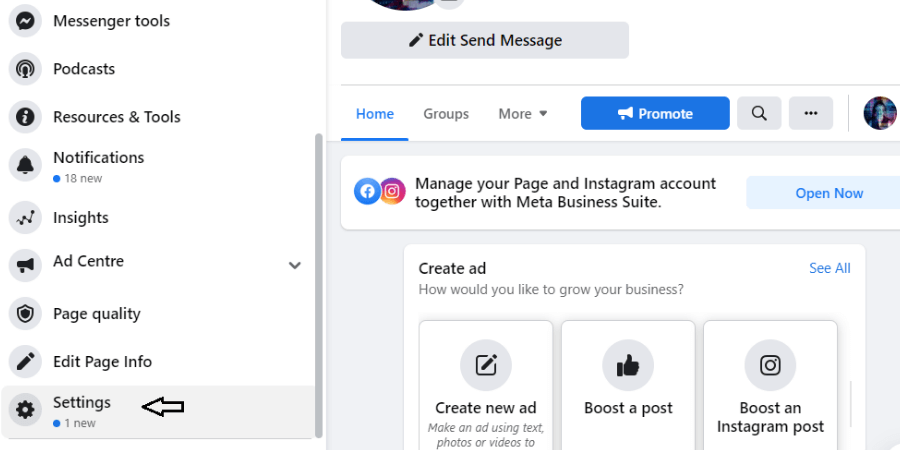
After finding the Settings tool or component, we need to click over it to access our Facebook page General as well as Messaging, Page info, templates and tabs type more settings.
6. Now we need to conquer the Messaging settings
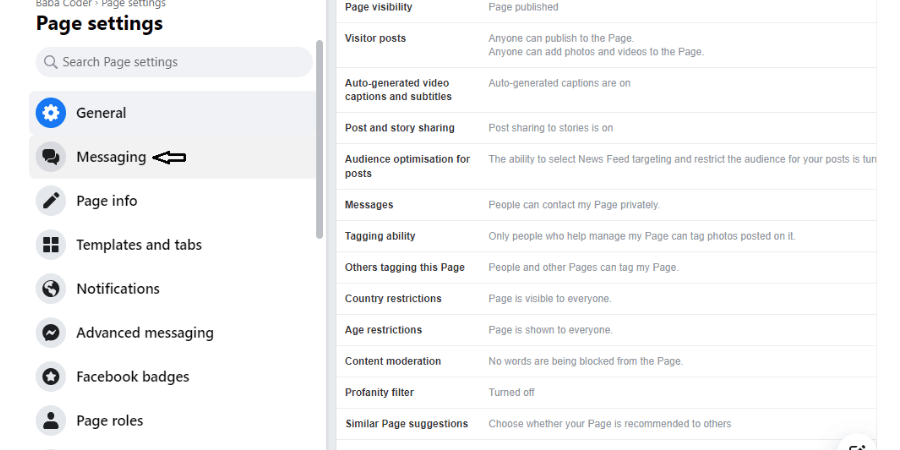
Inside the Facebook page settings, we are going to get our different Page Settings like- General, Messaging, Page info, templates, tabs, etc., as shown in the image too. Besides the sidebar components (General, Messaging &, etc.) their particular sub-setting of every component is been displayed, which you can able to customize further too. By default, the General settings have been displayed. But we need to find the Messaging settings and need to click over them. And automatically, the messaging sub-settings we can able to get.
7. Need to scroll down the sub-settings( right side area) displaying area, and find for- Add Messenger to your website

We need to scroll down our sub-settings Messaging displaying area a little bit, to find- Add Messenger to your website link. Then we need to click on Get Started button.
8. Set up your Chat plugin now
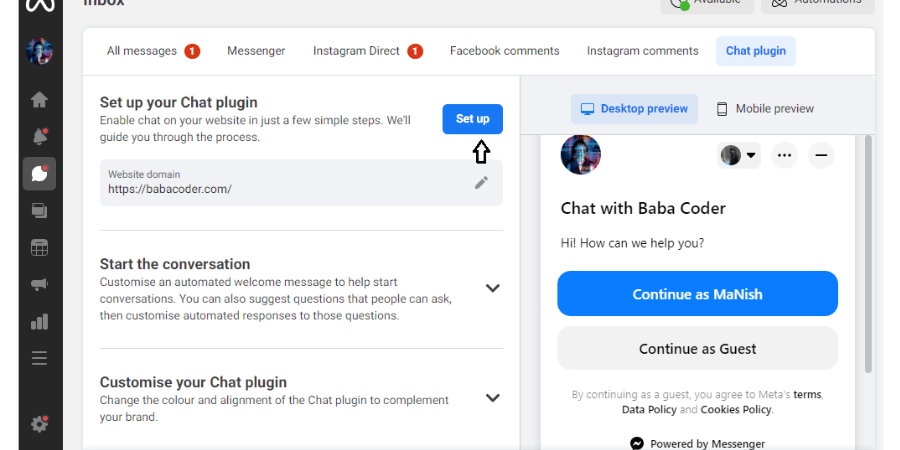
As soon as we click on the Get Started button, we can able to find the different further settings which we need to set up like–
- Set up your chat plugin- Here you going to decide your chat plugin language (inside the messaging box), your website you can set, copy source code
- Start the conversation- Here you can customize your Welcome title, Frequently asked questions (which are most asked questions by another user).
- Customize your chat plugin- Here you can customize your greeting message, guest chat on-off settings and etc.
Together with all settings, you can decide how properly your Messenger chatbot or chatbox is going to behave. The given source code you need to place inside your required webpage inside (<head>…</head>) tag, and refresh your page, the messenger chatbot must need to display there.
But very first you need to Set up your Messenger chat plugin first. So, click over it.
9. Pick any of the setup methods – Standard setup method is more recommended than other
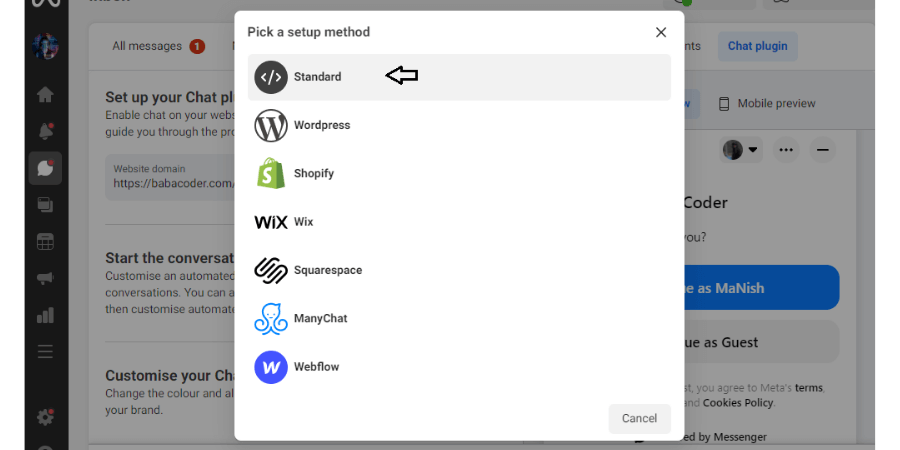
After clicking on the Setup button, a pop-up box will appear asking about picking a setup method. You can select any Standard, WordPress, Shopify, Wix, Squarespace, and other given methods. All setup methods are been very simplest one, you can simply able to customize them too. But in my case, I am selecting the Standard method.
10. Setup your chat plugin with the Standard method- I
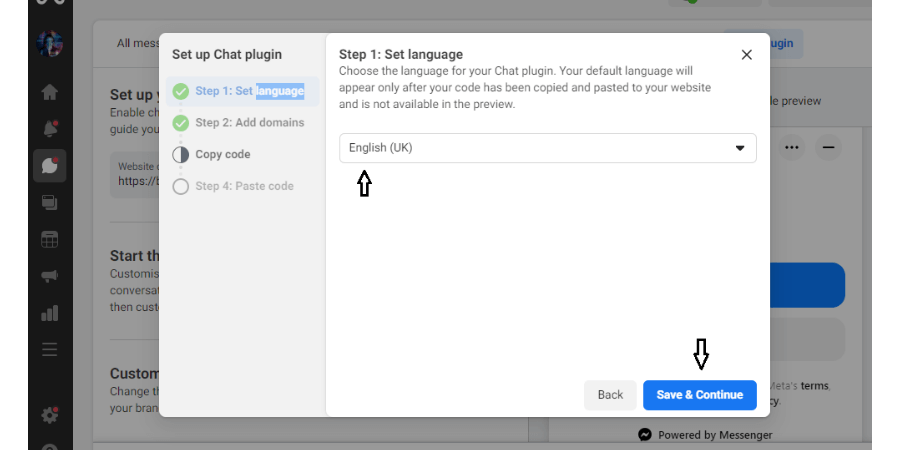
Now, customize your chat plugin as per your choice as it asks for very nominal details like- Set Language– where your required language of chatbox you need to select.
11. Setup your chat plugin with the Standard method- II
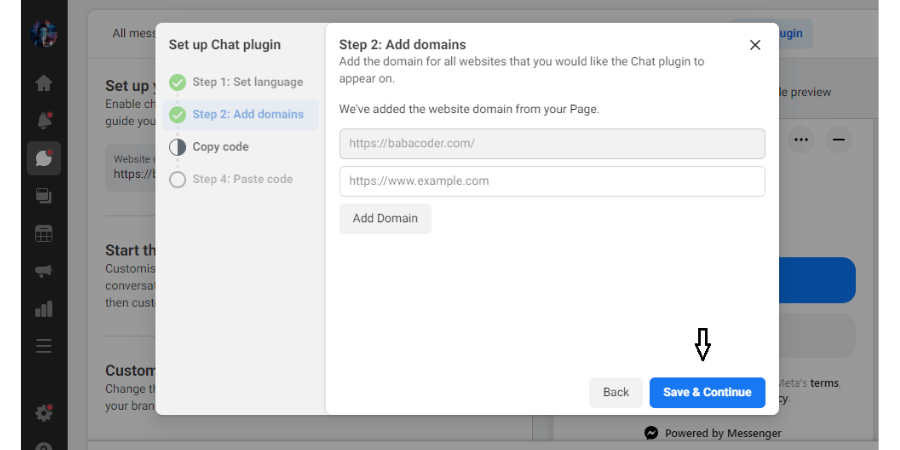
After selecting a language then you need to fill in your website domain URL, and then click on the Save & Continue button.
12. Setup your chat plugin with the Standard method- III
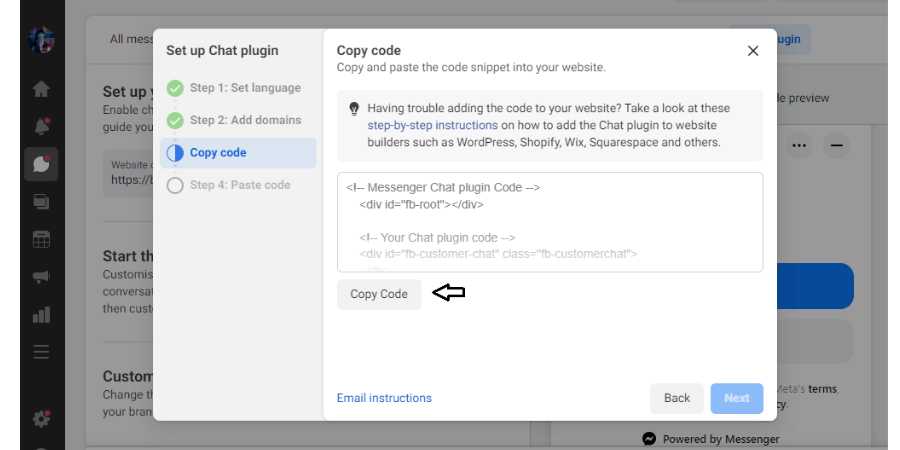
Here in the next step, you are going to get your chatbot source code, which you need to copy from the Copy Code button.
13. Setup your chat plugin with the Standard method- IV
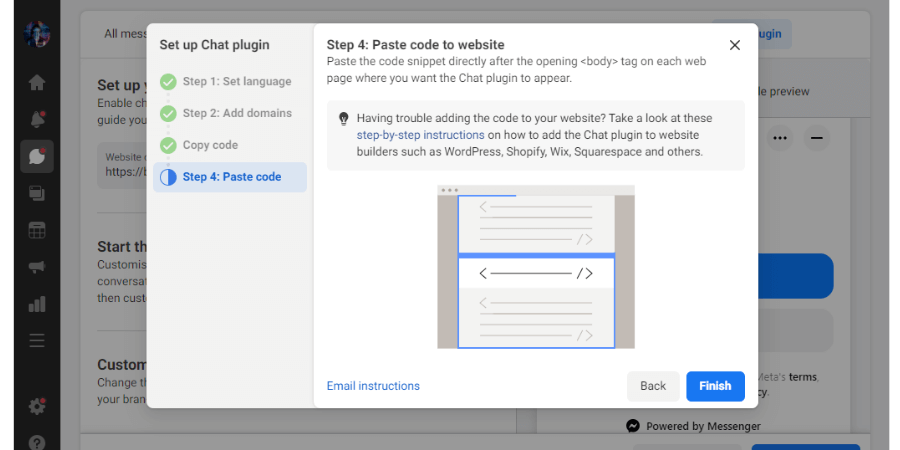
This Paste Code settings just described you or help you, where you need to paste this source code. You can check this as well, otherwise, click on the Finish button. Further, I too going to show you the place where you need to paste the source code.
As, above we have done everything, by which we can successfully include our Messenger chatbot inside the website. But I am going to explain here more about Start the conversation & Customize your chat plugin settings, as you can more able to customize your Messenger plugin or chatbot here, which is somehow important too.
But you may skip the following Customizing Chat Messenger Button section and move down directly to the Integrating Messenger Chatbot Through Custom Code section.
Customizing Chat Messenger Button
After setting up our Chat plugin, we can further able to customize our Messenger chatbot, Start the conversation & Customize your chat plugin settings. So let’s understand them one by one.
1. Start the conversation
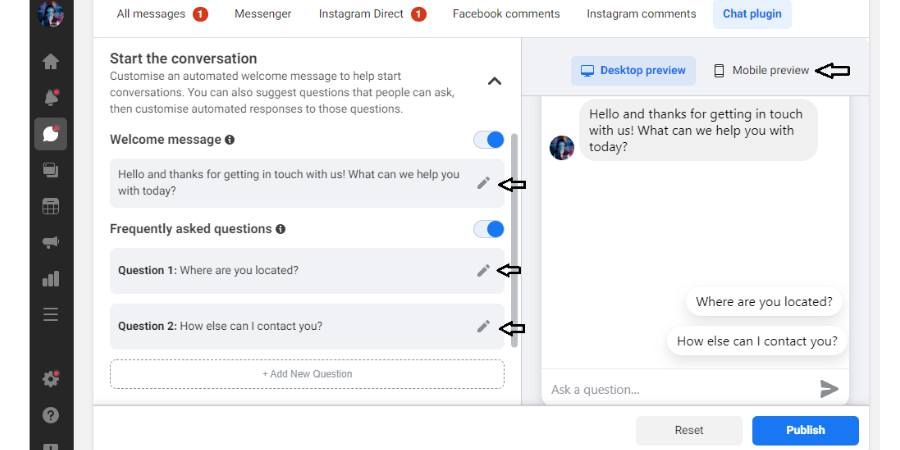
Inside this setting, we can able to customize the Welcome Message Settings, which going to appear as the first message inside the message box, after clicking on the Messenger button or plugin.
2. Customize your chat plugin
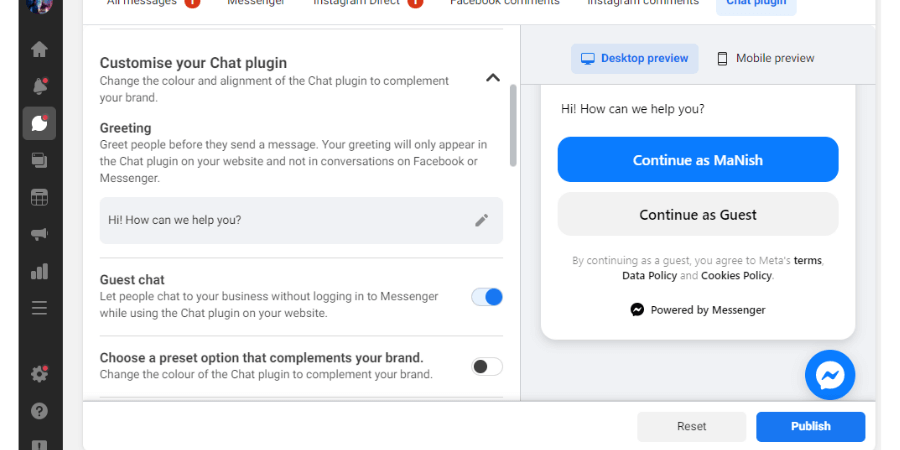
Here you can customize your greeting message (the very first message), then you can provide the option of Continue as Guest, where users can able to message, without login inside the Facebook, but if you turn it off then the user must need to login first inside the Facebook.
Also, you can able to customize the chatbot button shape, prominence, position, alignment, etc.
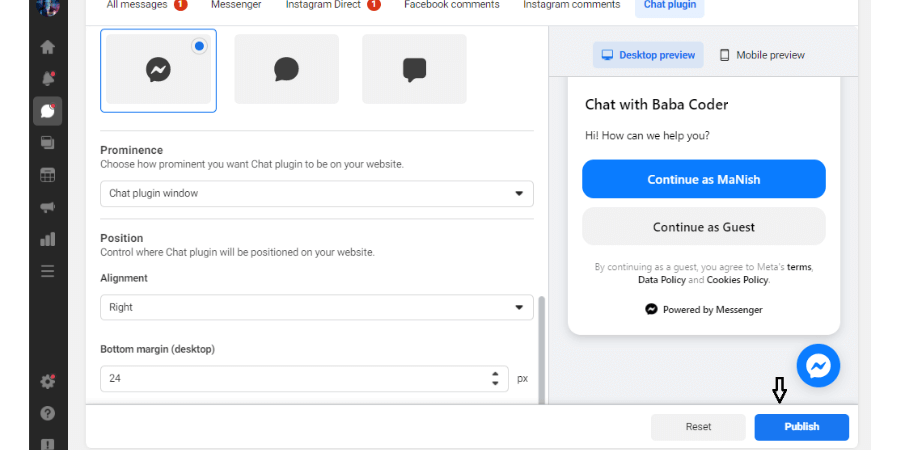
After customizing everything, you need to then click on the Publish button.
Integrating Messenger Chatbot Through Custom Code
Here we are going to elaborate, on the steps- how we are going to place the Messenger or Facebook chatbot or chatbox inside your custom-coded website. And the procedure is as follows:-
1. Place your Messenger chatbot source code inside your desired webpage
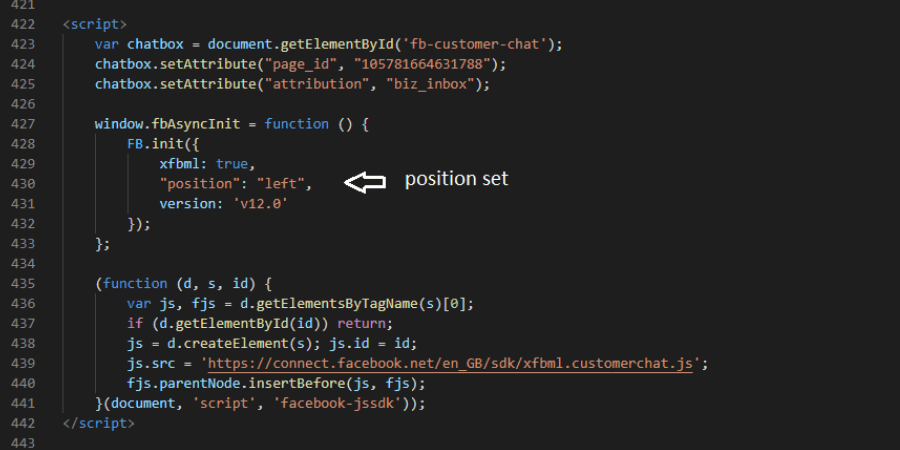
Now, inside your desired webpage, you need to place the copied source code, which we get from Facebook simply inside the (<head>…</head>) tag.
2. Upload your webpage inside the server and refresh the webpage link or website

If you are doing it on your Local computer first then you need to update it inside the live server too. And then refresh your particular webpage or website or URL. If you want to know how to live your custom-coded website and where the files need to upload inside the Live server, then must visit this post- https://babacoder.com/blog/how-to-live-your-custom-coded-and-wordpress-website/.
If all goes well, then after refreshing your particular webpage you are able to get the fully-functioning Messenger chatbot or chatbox button.
Integrating Messenger Chatbot In WordPress
We will discuss here now, the procedure needs to follow if you want to have the Messenger chatbot inside the WordPress-designed website or webpage. So the procedure is as follows:-
1. Access your WordPress Dashboard
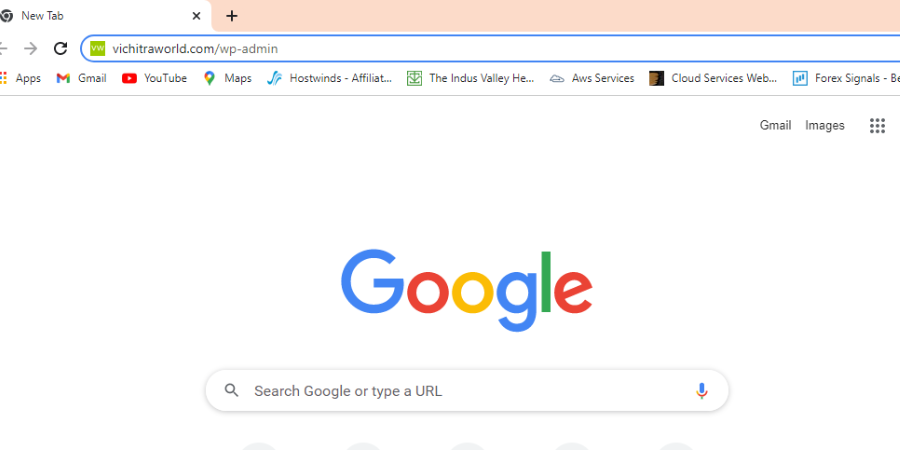
The very first step is to access your WordPress dashboard, and you can able to access it just by pasting your website URL followed by /wp-admin.
2. Fill up your WordPress login details
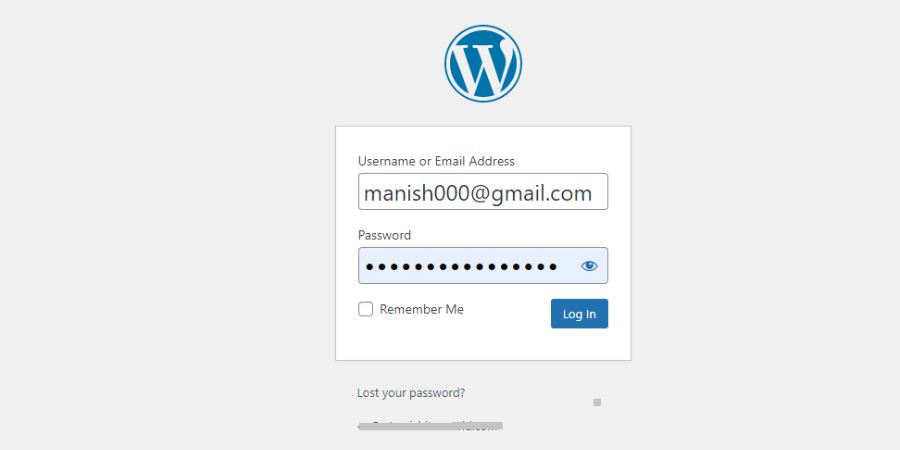
Here you need to feed in your WordPress login details first like- WordPress associated username or email and password. If anyhow you forgot everything like your WordPress-associated username, email address, and password, then you can take the help of our this post- How to edit WordPress user email and password from the Live Server Database.
3. Inside the WordPress dashboard, go to the Appearance component or tool
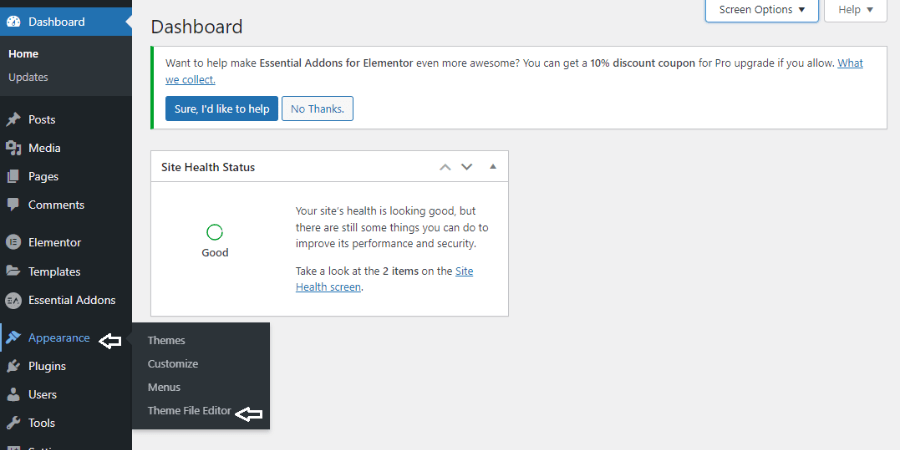
You need to go over the Appearance tool or setting as we want the files regarding our site, where we going to place the Messenger chatbot or script code. So go inside the Appearance > Theme File Editor.
4. Search and access your Theme Header file
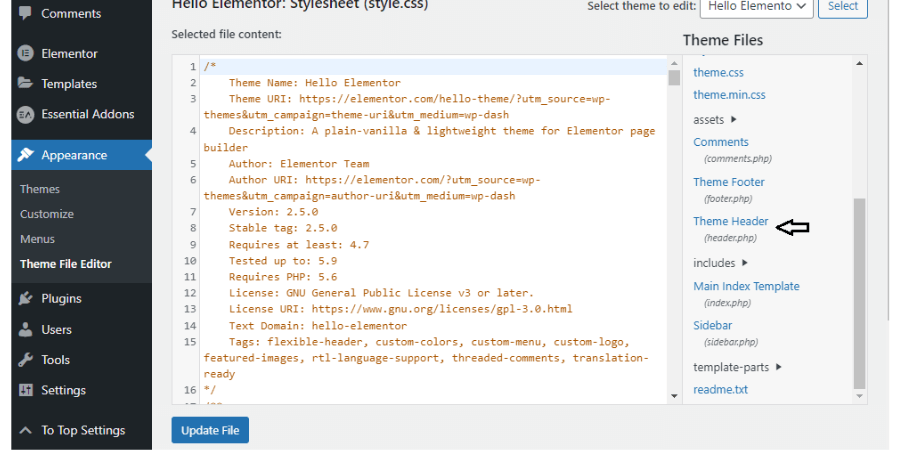
Inside the Theme File Editor now, you can able to access your website theme files, where you need to search for the Theme Header file, naming (header.php). Just click on it.
5. Inside the Theme Header file paste your copied Messenger chatbot or script code
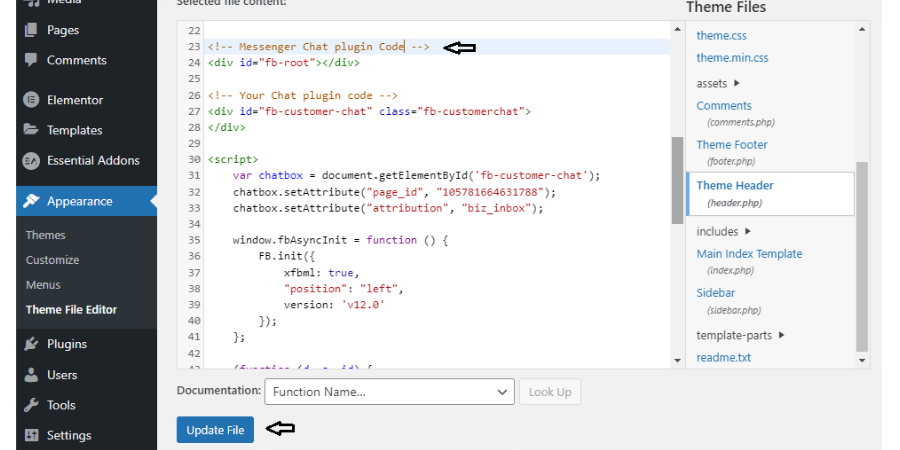
Now, the copied Messenger script code, you need to place here inside the (<head>…</head>) tag. And then update your file.
6. Refresh your webpage link or website
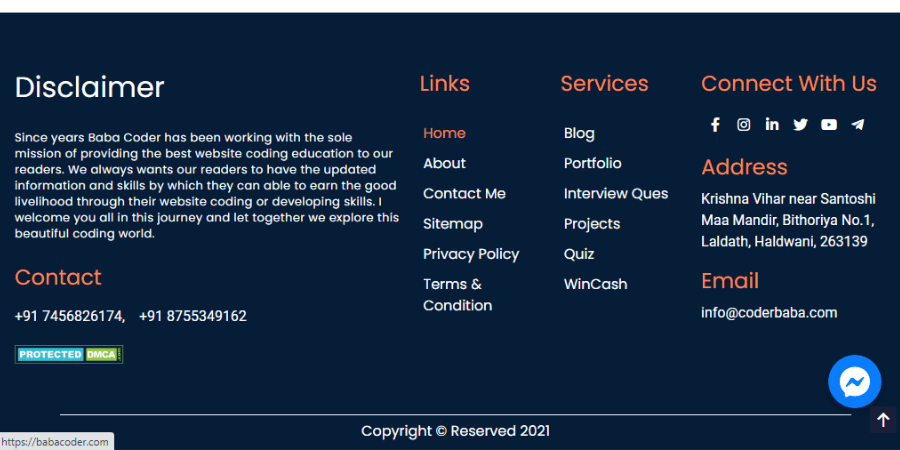
After updating everything, then just refresh your website or webpage link. If all goes well, then you are able to get the fully-functioning Messenger chatbox button inside your website, as shown in the image too.
Conclusion-
So here in this post, I have explained every step by which you can able to place the Messenger script button inside your custom-coded website as well as in WordPress. If then also you are facing any issues then feel free to comment down below, I will surely help you.
If you want to know the procedure of how you can embed the Tawk script inside the website then must visit this post- Live Chatbot integration inside custom-designed or WordPress websites, and for embedding the WhatsApp script inside the website, then must visit this post- WhatsApp chatbot integration inside custom-designed or WordPress websites. Stay tuned for more such information.


