“We all know about the e-commerce websites or e-commerce platform, which has the motto of selling the services or goods or any products through the internet medium. There are tons of e-commerce websites like- Amazon, Flipkart, Myntra, eBay, etc. where you can easily list, sell and even buy any product. And now in this 21st century, these e-commerce websites are in trend. More and more people are developing these types of websites, where they are selling their own products or services. Also, it is one of the highest, growing sectors in the online market.
In our previous posts, we have talked about Ecommerce Websites creation through WordPress in just 10 minutes and you need to check it before this post if you too want to know how to import or develop an e-commerce website in WordPress. WooCommerce is been a powerful, free, popular, and easy-to-use e-commerce plugin. It is designed for small to large-sized online merchants using WordPress. Easily it allows us to add products, shopping carts, other checkout options, etc., which means it is a full package through which we can able to turn a WordPress website into an e-commerce store or site. As WooCommerce has its own configurations or settings which we need to understand if we too want to build a full-fledged working e-commerce website, and in this post, we will be understanding those settings only.” Also, we will be able to set here the payment settings for our store.
As, in our earlier post, we have imported the e-commerce store through the ‘Astra’ theme, and automatically our required theme had downloaded the WooCommerce plugin. After accessing the WordPress dashboard check inside the plugins, you will be able to find the WooCommerce plugin but if also the plugin is not installed by itself then don’t worry, we are knowing everything here. So let’s start:-
1. Firstly we need to check or add WooCommerce plugin
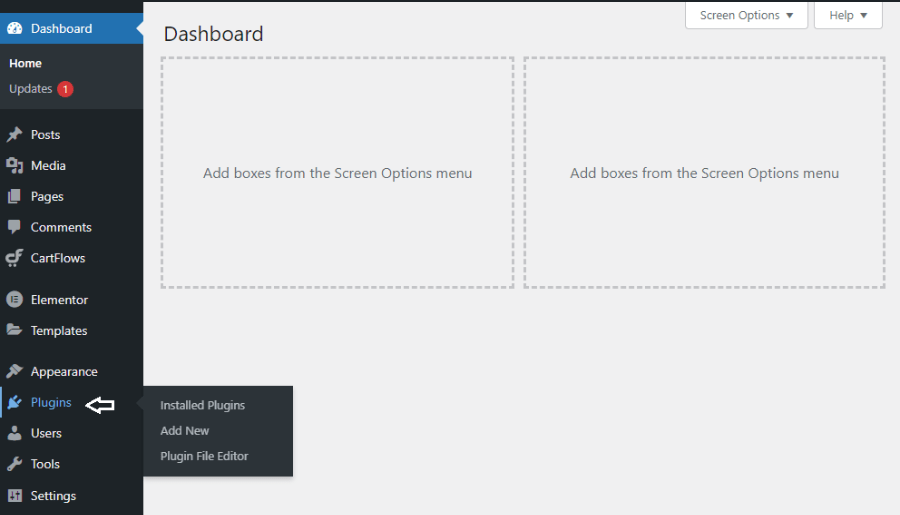
Firstly, you need to check whether your WooCommerce plugin is installed or not. And you can able to find it in two ways:-
- Inside the WordPress dashboard, to the left side of the panel, you can able to find the Plugins sections, click there and search for the WooCommerce plugin. If this plugin is already installed then you can able to find the plugin here else not.
- If your WooCommerce plugin is successfully installed or activated then automatically WooCommerce plus Products settings you will be able to find inside the left panel of WordPress dashboard.
2. If WooCommerce plugin not installed then install it
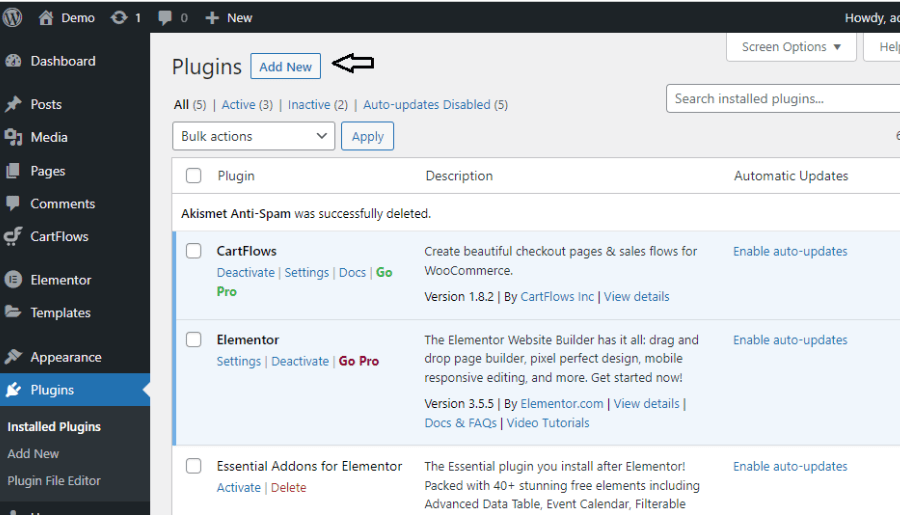
If in case, the WooCommerce plugin is not installed then simply inside the Plugins section, go to Add New button, so that you can able to download the new plugin.
3. Search for the WooCommerce plugin
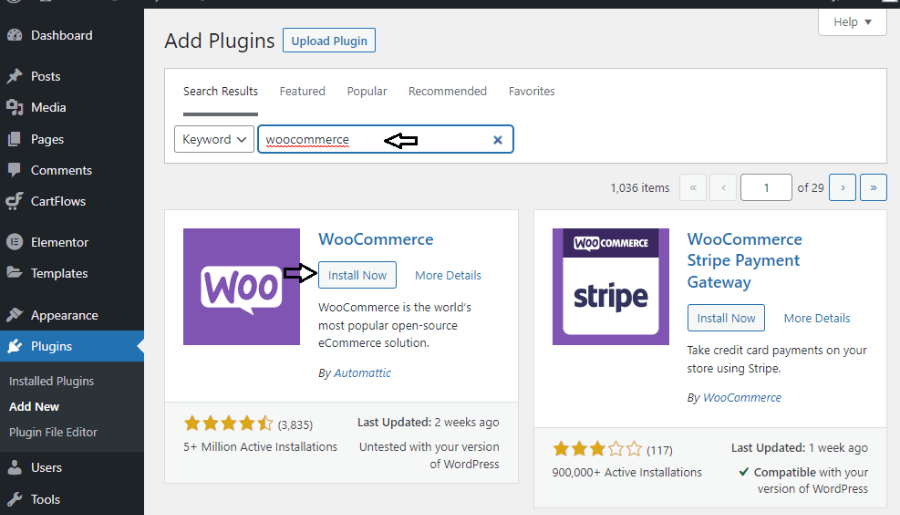
Now, inside the search bar, type WooCommerce and as shown in the image also, after finding the plugin, click on the Install Now button.
4. Activate your WooCommerce plugin to customize further
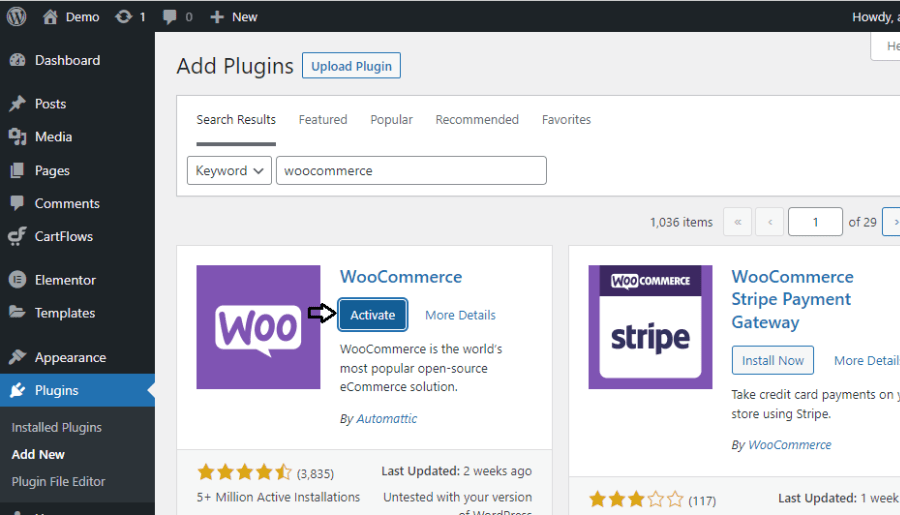
After successfully installing the WooCommerce plugin, click on the Activate button to successfully customize or use or activate this plugin.
5. WooCommerce or Product Settings you can able to check inside the left panel of WordPress dahboard
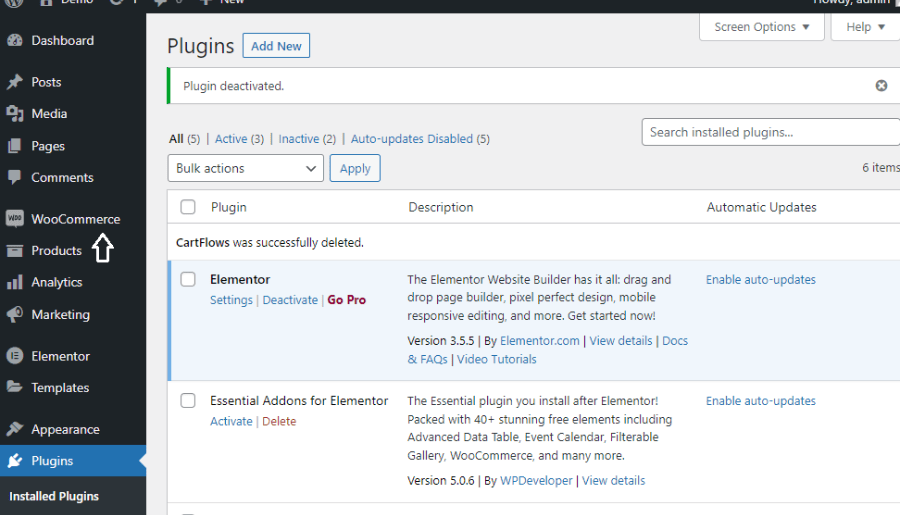
If, you have successfully installed or activated the WooCommerce plugin, then automatically the WooCommerce as well as the Products settings you will be getting inside the left sidebar of the dashboard, as shown in the image too. Simply you need to click over it to customize further.
WooCommerce Basic Understanding
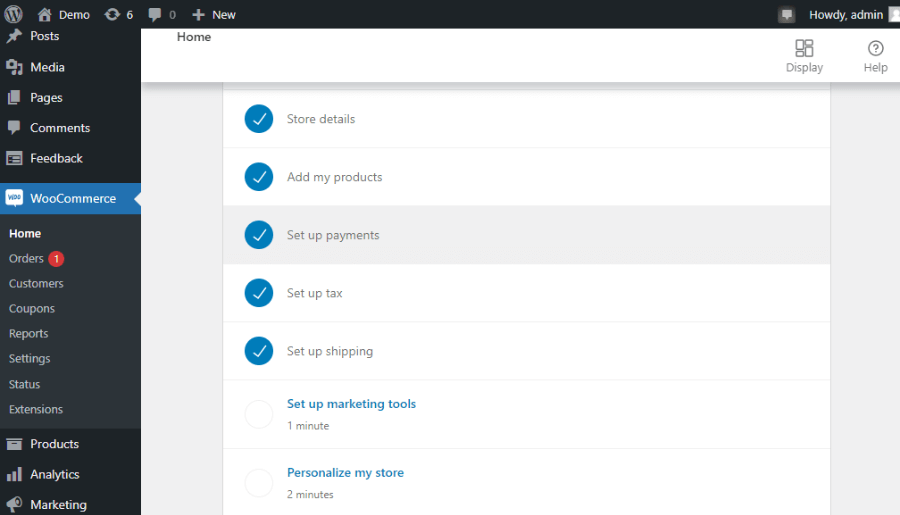
As of now, we have known about the WooCommerce plugin and also about its installation & activation phase. Now let’s talk about the components or services offered by the WooCommerce and these are as follows:-
(i) Home- Generally it is the summary of all the setup required inside the WooCommerce plugin. Through here also we can set up our basic store, payment, shipping, tax, and other customizations settings.
(ii) Orders- We can able to track our successful, declined, returned order details. Every new order by the customer can be accessed inside this section. Also, the admin can able to create or manage the order too.
(iii) Customers- From here we can able to list out the details of the customer. Our every customer detailing we can able to find here.
(iv) Coupons- As admin can create their customized coupons here, so customers can apply these coupons and get the decided discount percentage. It generally increases the buyer’s engagement.
(v) Reports- Here we can able to track the yearly, monthly, and daily reports of the customer orders list, customer profile list, stock list, inventory list and etc.
(vi) Settings- From here we can customize every WooCommerce setting like- Account & Privacy, Payment, Email, Integration, Product, Tax, etc details.
(vii) Status- We can able to check and customize WordPress, Server, Database, Post type, Security, etc. environment.
(viii) Extensions- You can get free as well as paid extensions here.
So, it is the basic understanding of the components provided by the WooCommerce plugin. Now let’s understand the important setups which is the important step to move ahead. So let’s start:-
1. WooCommerce Setup- Part1
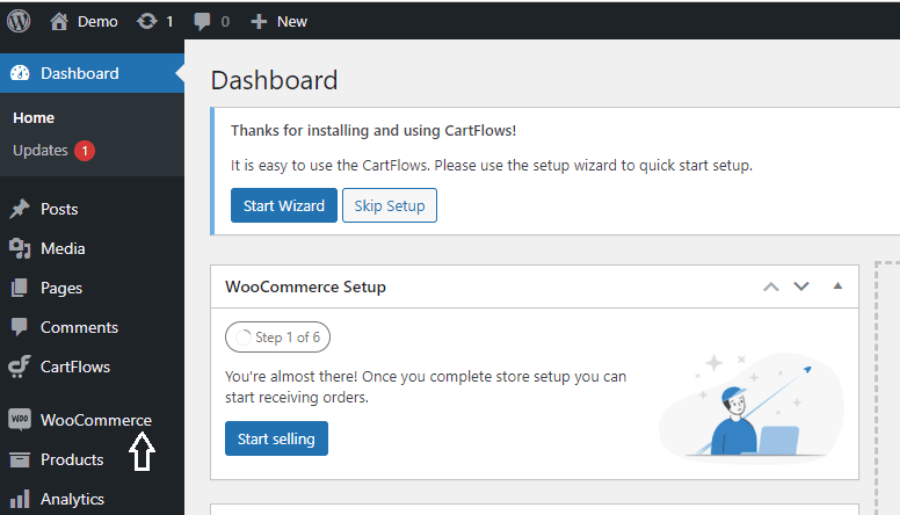
Now we need to set up the basics WooCommerce settings so we can able to start selling our customized products. We need to list here our Store, Industry, Product Types, Business details, etc.
2. WooCommerce Setup- Part2 (Feed Store details)
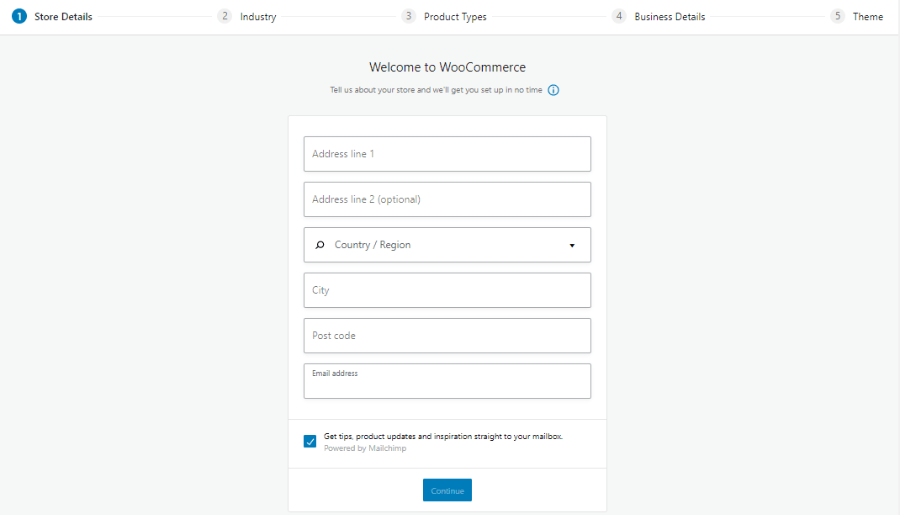
Here in this step, we need to feed the nominal Store details like- Address, Country, City, Postal Code, Email Address, etc. You need to fill up your business or store details from where your products inventory is stored.
3. WooCommerce Setup- Part2 (Feed Store details)
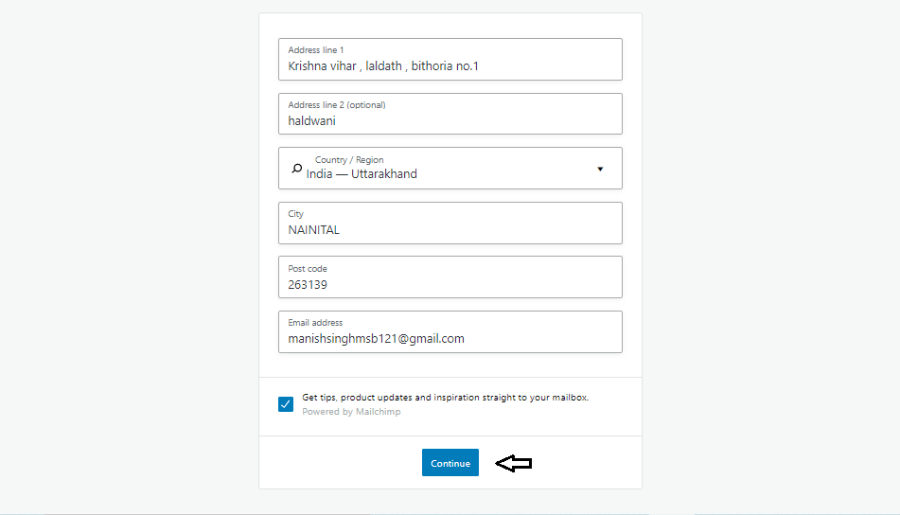
Simply, fill-up the store details, and then proceed further by clicking on the Continue button.
4. WooCommerce Setup- Part3 (Feed Industry details)
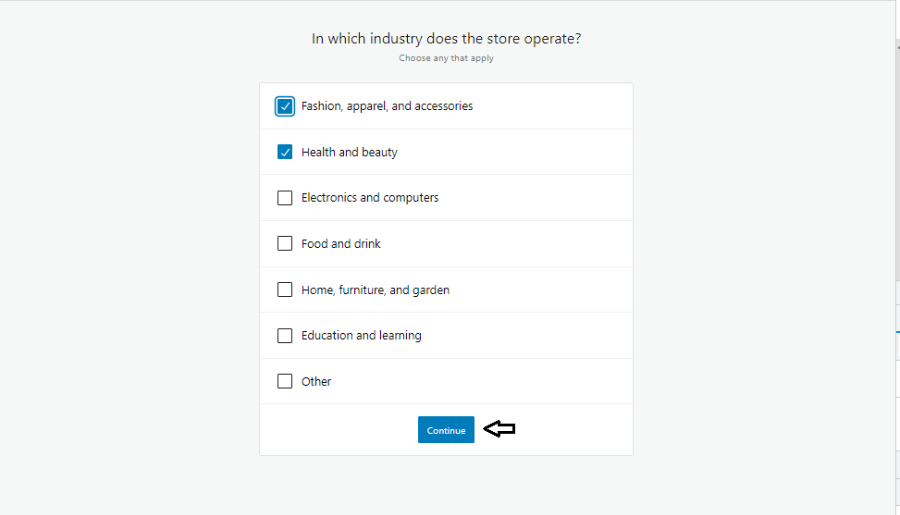
Now, here we need to select our Industry type, kindly select your industry type then click on the Submit button.
5. WooCommerce Setup- Part4 (Feed Product details)
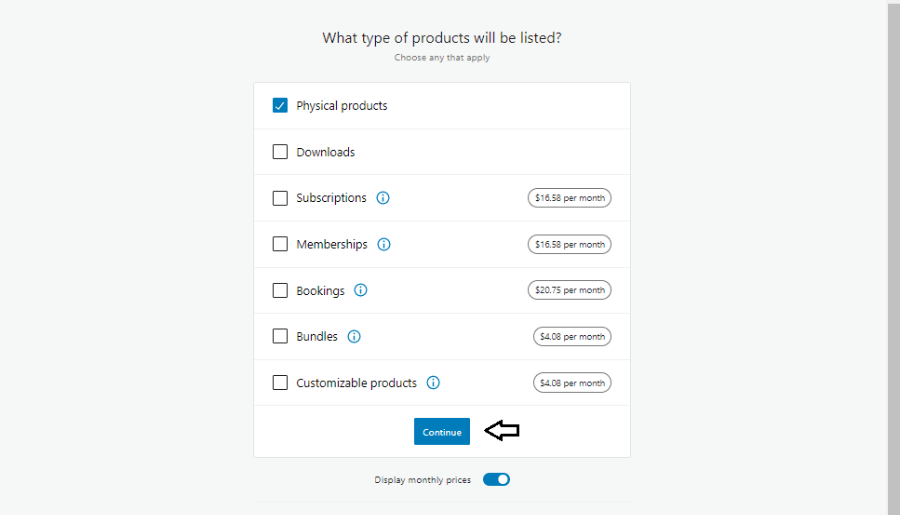
Which type of products we are going to display inside our store or website, we can decide over here. In physical products, you can able to sell any physical product whereas in downloads you can able to sell like- e-books, downloadable music, internet radio, internet television, streaming media, fonts, logos, photos, graphics, digital subscriptions, online ads (as purchased by the advertiser), internet coupons, electronic tickets, electronically treated documentation, etc.
6. WooCommerce Setup- Part5 (Feed Business details)
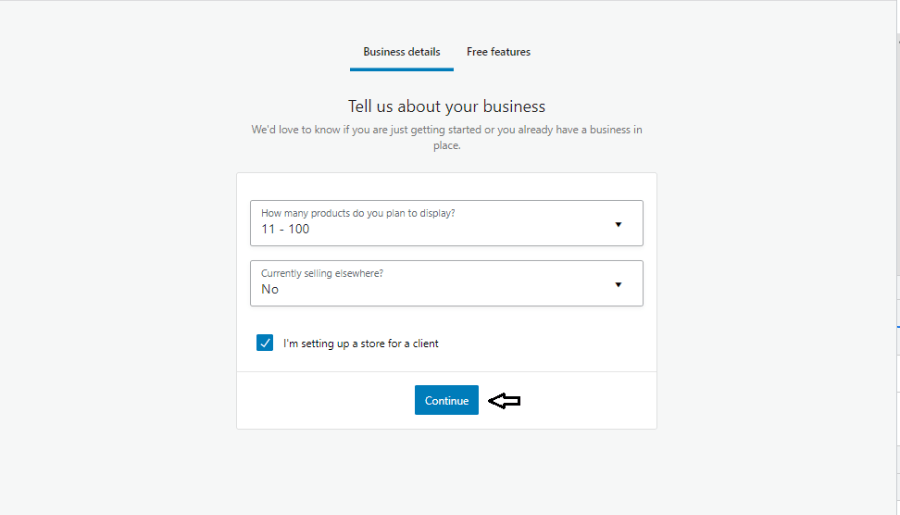
Now we need to talk about the business details where we need to tell our numbers of products that we want to display on the website, also any current country name where we are selling our products. If, yes then we need to specify that country name, else we need to select the No option.
7. Check the checkbox if you want included additional free business features
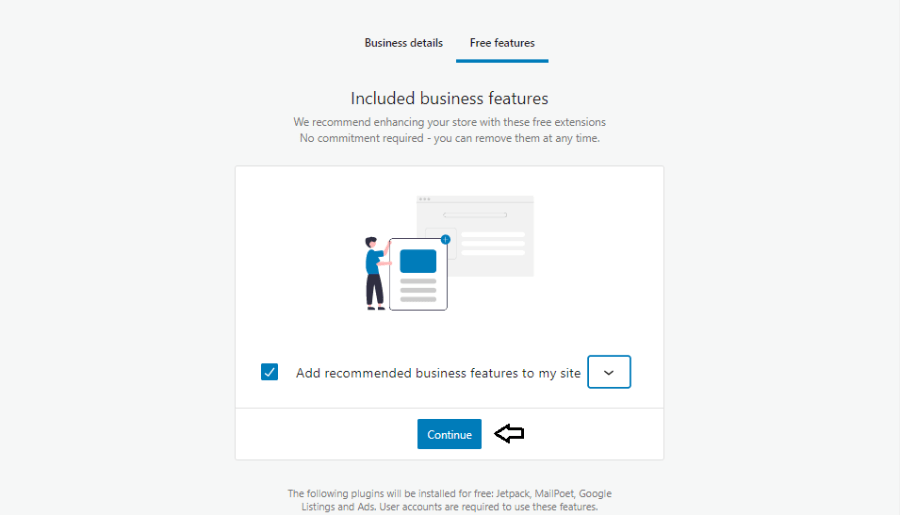
You can able to add Mail Marketing features and other beneficial features too. Simply to add these features you need to check the checkbox and select the additional features. After selecting simply click on the continue button and it automatically starts importing. But you can also able to add these features later on when your whole website, products, and everything is in the ready stage and has been executed.
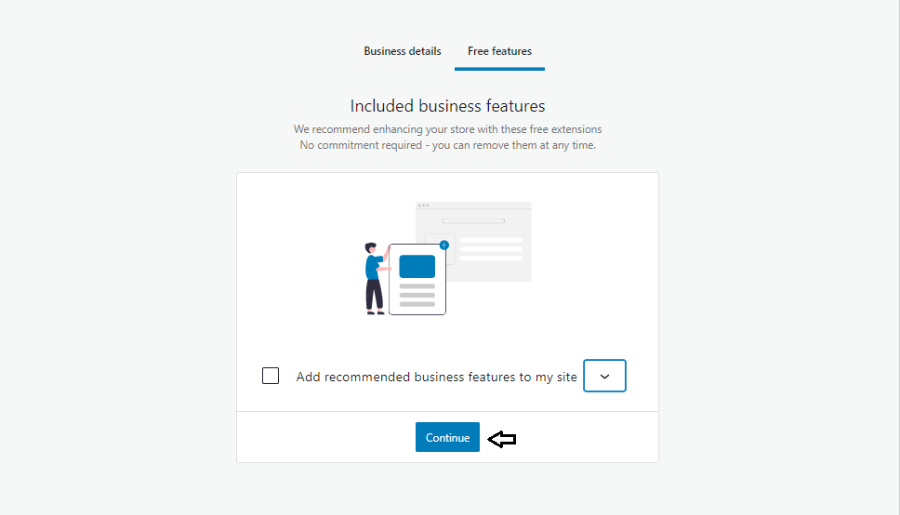
So, as for now, I am escaping this option by unchecking the checkbox, and simply, I am clicking on the Continue button.
8. WooCommerce Setup- Part6 (Choose a theme)
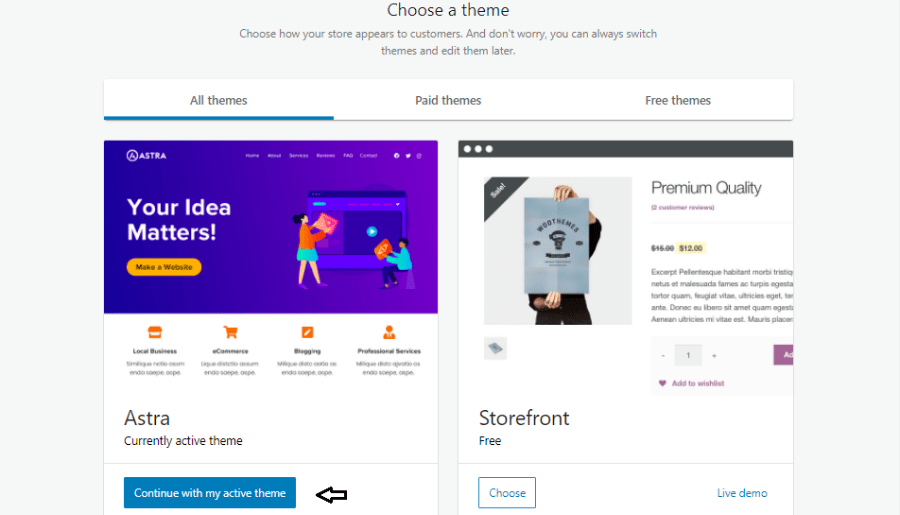
So now, you need to select whether you want to adopt a different active theme or you need to continue with your current theme. In my case, I am selecting my current installed and activated theme ‘Astra’. So I am clicking simply on the Continue with my active theme button.
9. Now, we need to hold for a while as it is connecting our store
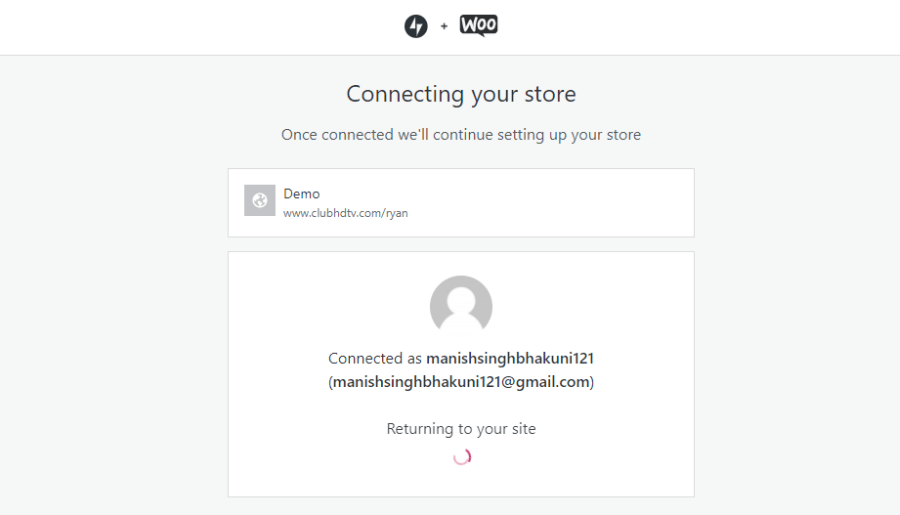
So, here we need to hold for a while as our store is connecting with our account. You can also able to enable the Jetpack which is again a free plugin that can power up and protect the store. Again its up to you.
10. Now return back to the WordPress dashboard
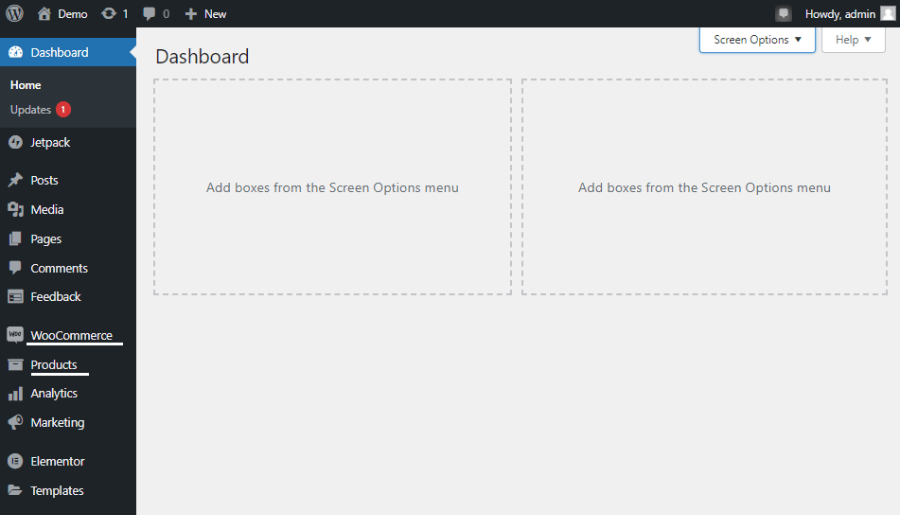
So, after setting up the WooCommerce, simply we need to come back again to the main dashboard, which we can do by just clicking on the Home icon with your site name on the top left of the panel.
11. Access the WooCommerce Settings by clicking on the Settings link inside WooCommerce
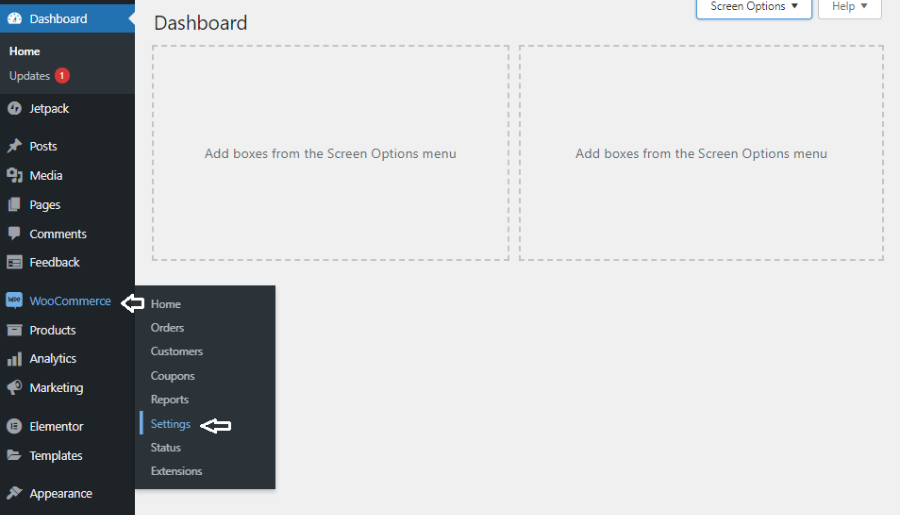
Now we need to access the WooCommerce settings. So simply we need to click first on the WooCommerce link and automatically new dropdown will appear where we are able to check the Settings option. Simply, we need to click it, which will then automatically redirect us to the WooCommerce Settings kit.
12. Customize the WooCommerce Settings- Part1 (General)
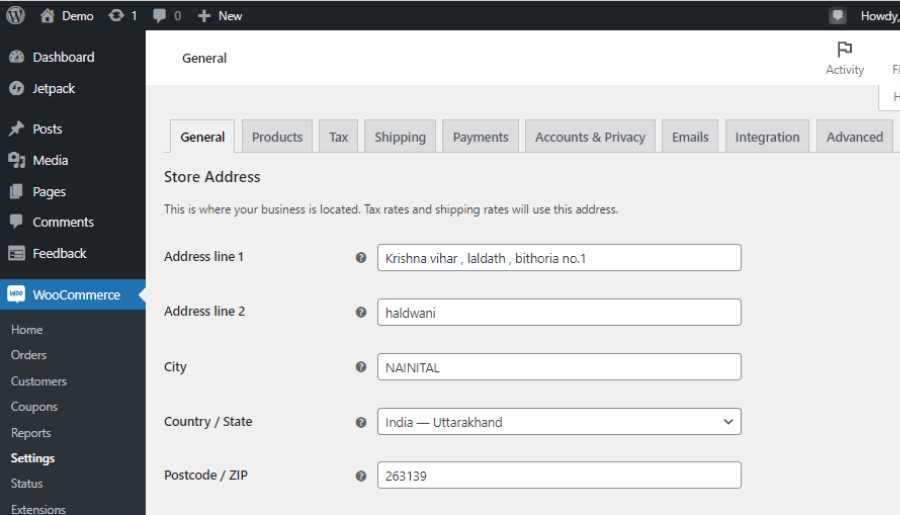
So, the process begins now. Inside our General Settings, we need to fill up our address details of store, city, country name, postcode where our current store is.
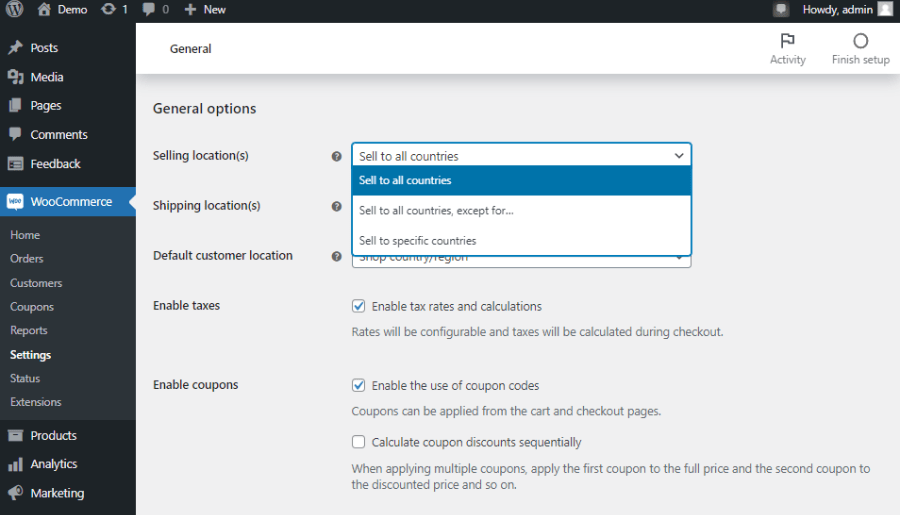
Also, we need to mention our Selling locations, where we will be selling our products, we can also able to select custom countries too. Also, we can enable tax-rated and coupon features by checking their respective checkboxes.
As, during the WooCommerce setup, we have provided some of the details earlier like- Address, City, Country details, etc., and WooCommerce is a powerful plugin, it automatically filled up some of the details which they have asked already.
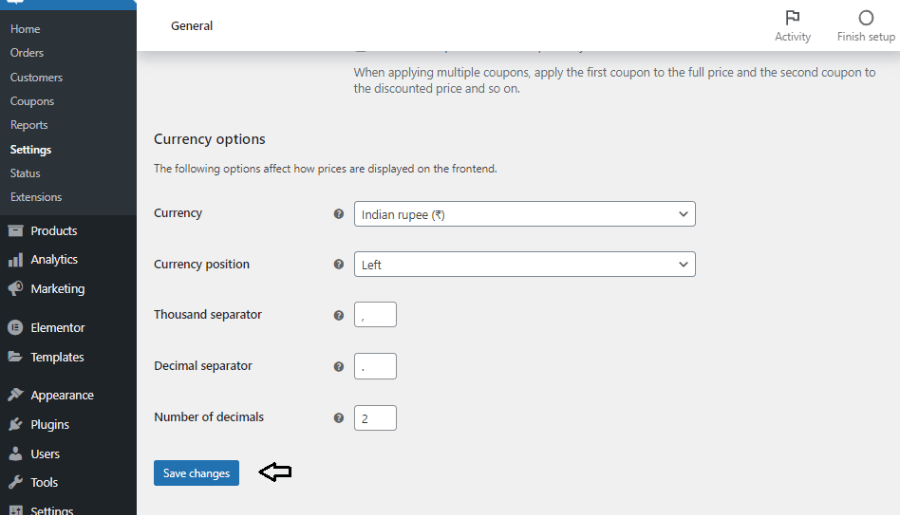
Also, inside the General settings, we need to fill up our currency details like our currency name, where should your currency sign positioned, thousand and decimal separators, etc. Then after feeding everything click on the Save Changes button.
13. Customize the WooCommerce Settings- Part2 (Products)
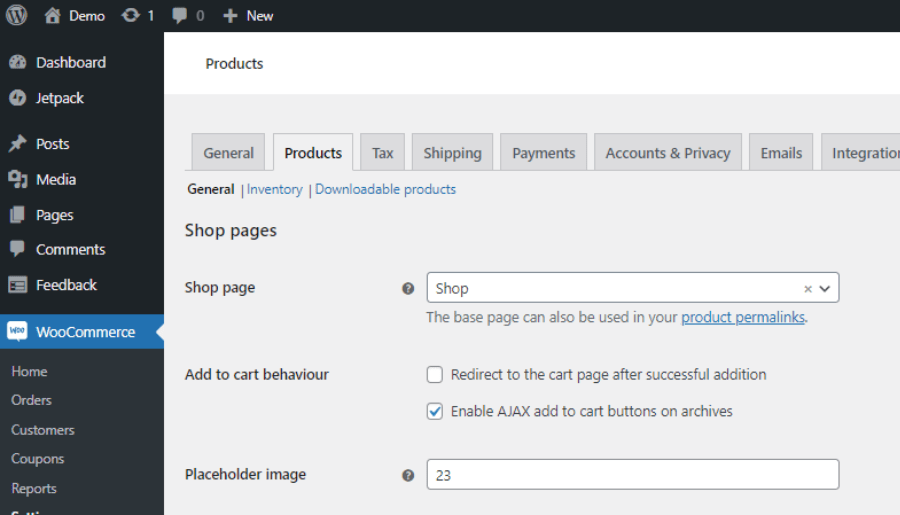
Now in this step, we need to customize our products page settings. So simply inside its internal General product settings, it asks us the particular shop page name, then it is asking us the add to cart behavior, where we have checked on the ‘ Enable AJAX to add to cart buttons on archives. ‘ has selected so that whenever any customer wants to add an item to the cart, rather than redirecting to the cart page, automatically selected product will add inside the cart page. AJAX just makes our web page load fast as it has the power of interacting a small portion direct to the server without reloading the full webpage and it saves the load time, which is again a good factor for website SEO (Search Engine Optimization).
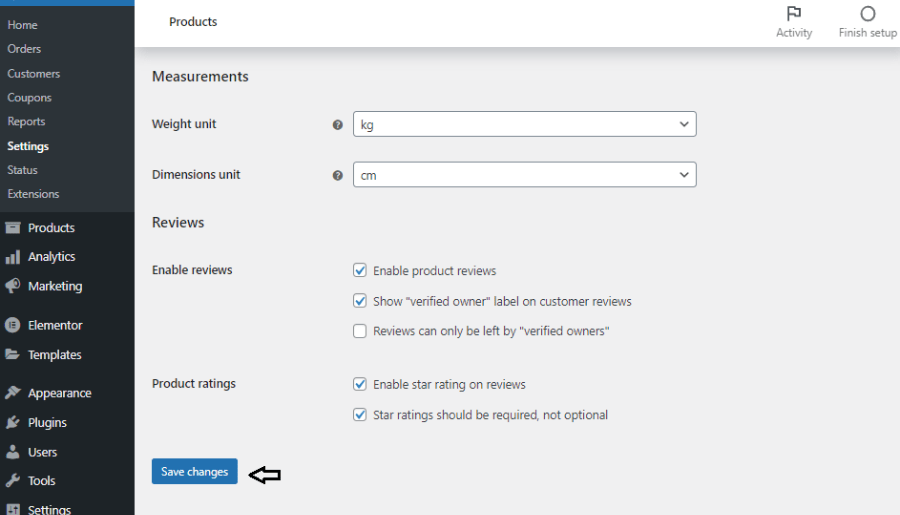
Some more details like- Product measurements, weight, and dimension unit we need to add here. Also, we can able to share the product ratings too on every product. So simply we need to check our desired checkboxes.
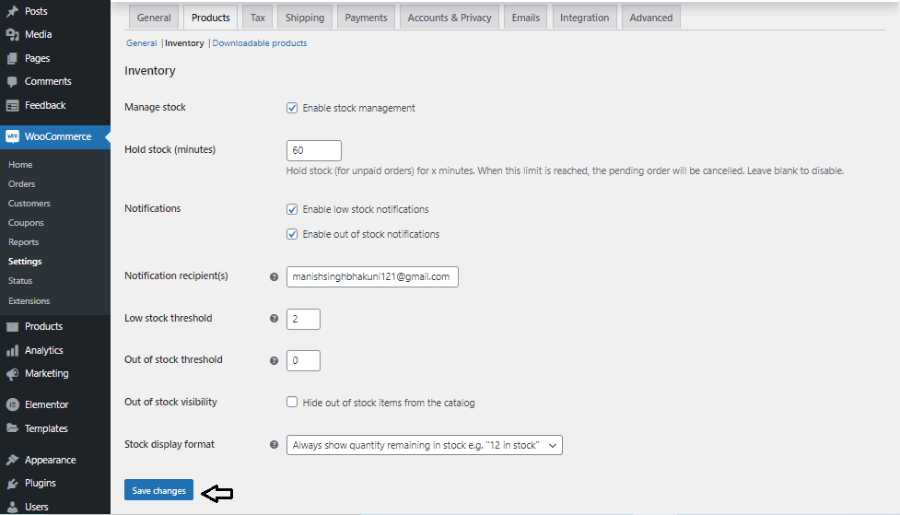
Now inside the Product internal Inventory settings, we need to feed the basic inventory details of our store like- Hold stock time, notification settings, low stock, of stock threshold unit. You can able to customize it too. So according to your requirements change the necessary settings here.
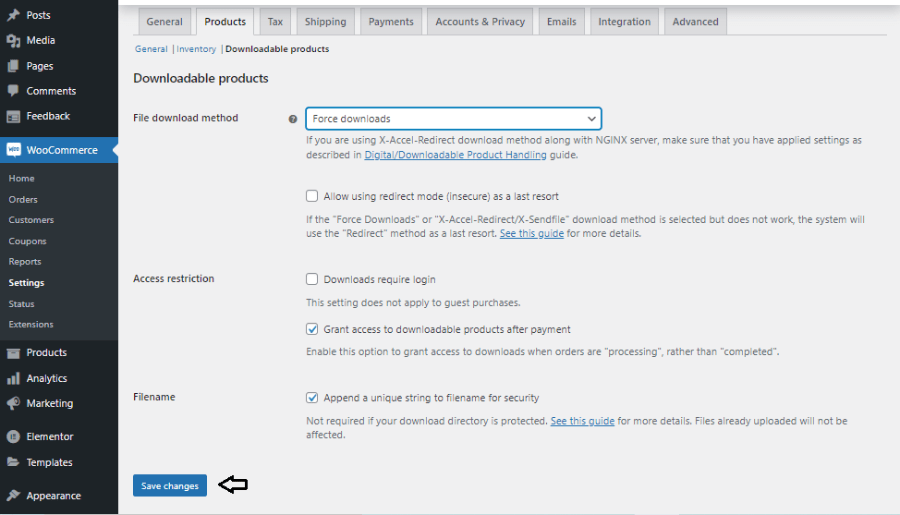
Product Settings have one more internal setting for downloadable products. If your store has downloadable products then you can able to customize them, else click on the Save changes button below.
14. Customize the WooCommerce Settings- Part3 (Tax)
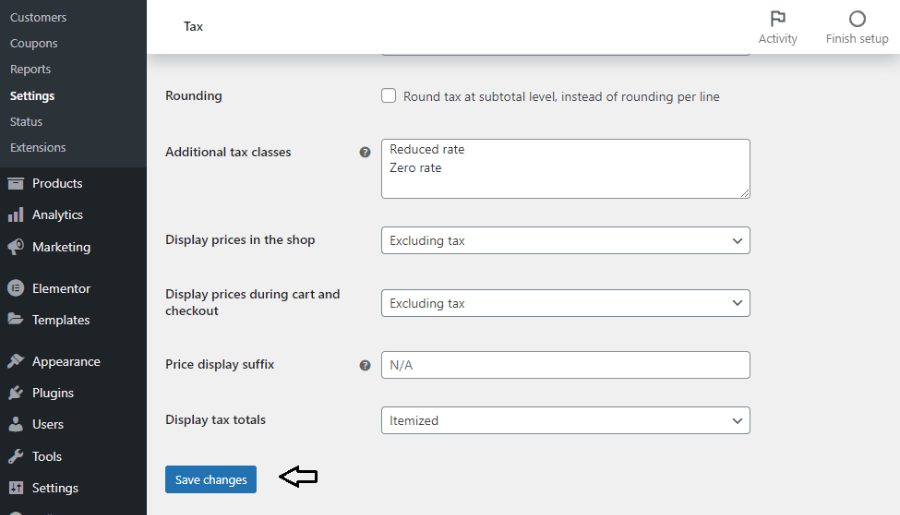
Now we need to talk about the tax details as different countries can have additional tax rates. For example:- If we are selling our product in India country then additional GST we need to add on to our product. So tax rates we can customize.
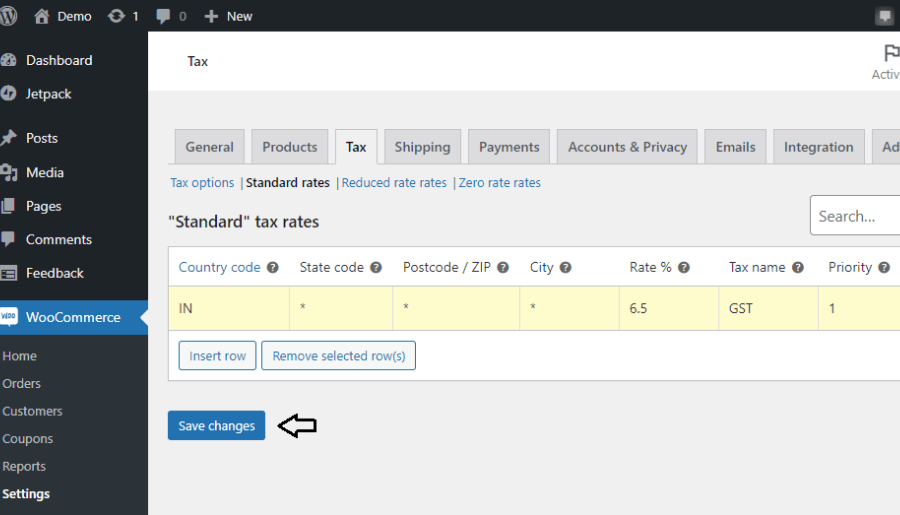
For specific standards, reduced and zero tax rates we need to insert a row and fill up our required tax rates, and then click on the Save changes button.
15. Customize the WooCommerce Settings- Part4 (Shipping)
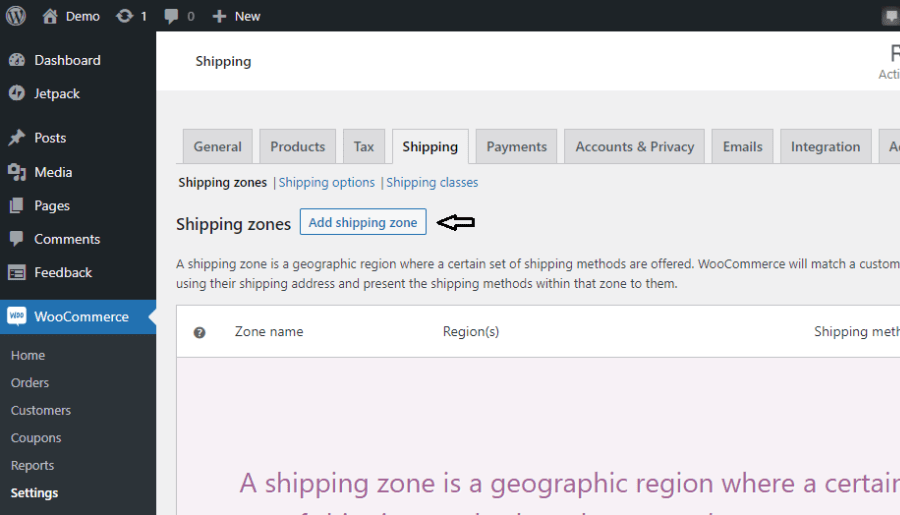
Now we need to fill up our shipping area or zone details. So to add a new shipping zone, simply click on the Add shipping zone button.
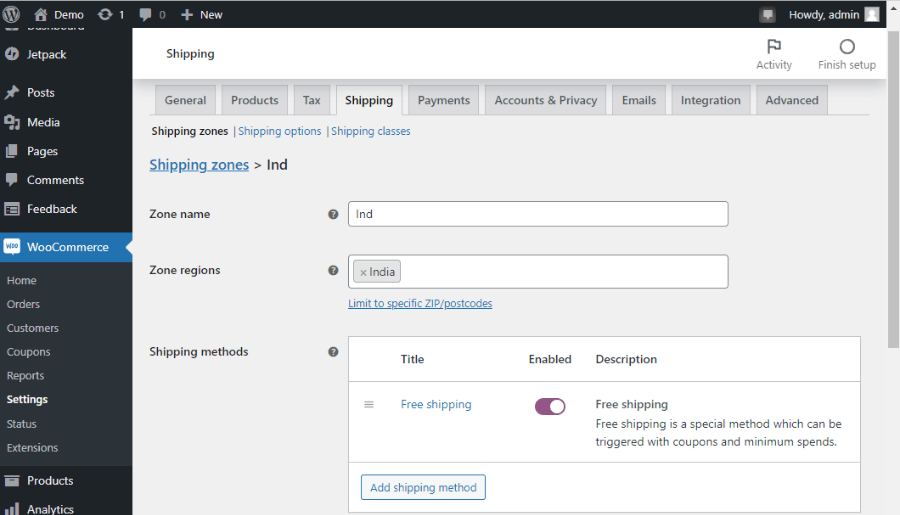
To add a new shipping zone, add your desired zone name, regions, and the last shipping methods where you can apply for the flat rate, free shipping, and local pickup shipping method.
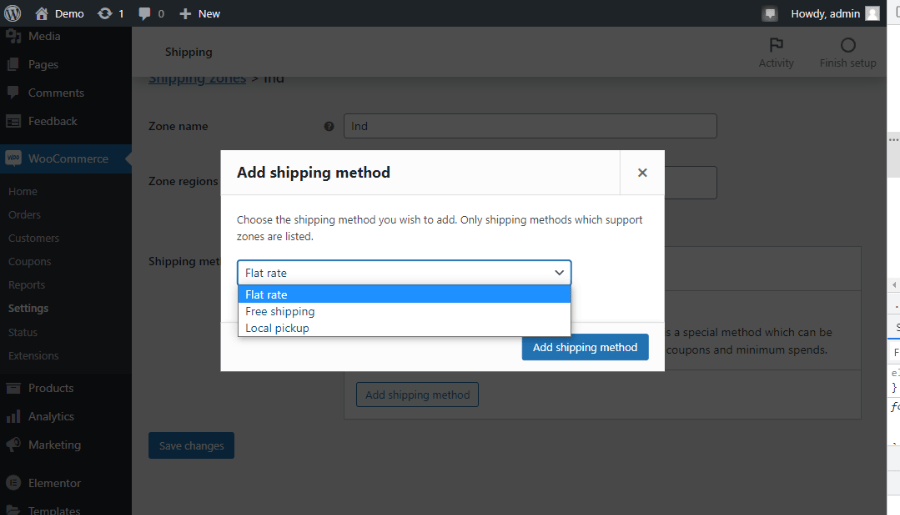
For example:- In any particular zone, you are providing free shipping charges or you are providing free shipping charges if the customer purchases more than 2000 Rupee products. Or in one scenario you are charging a particular shipping rate in the particular zone. So you can able to customize the shipping methods by simply clicking on the Add shipping method button and selecting your desired shipping methods.
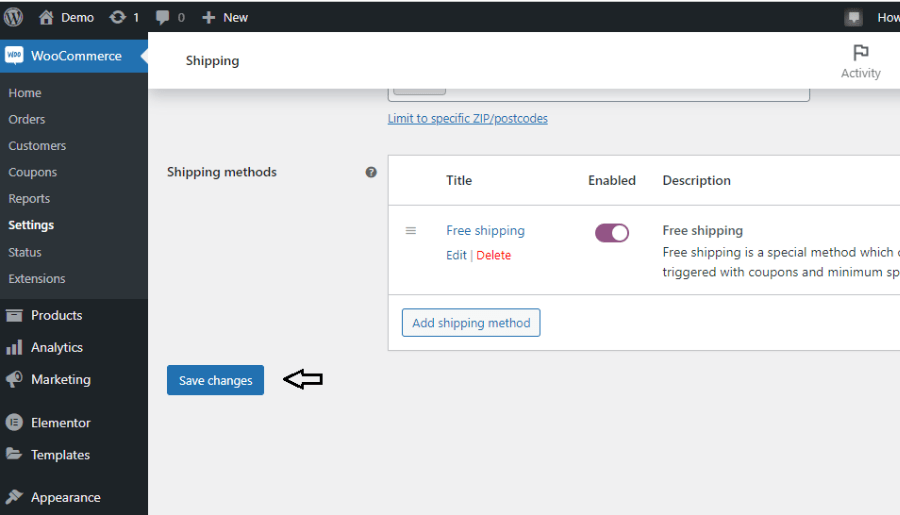
You can also able to edit or delete your current shipping methods. And after customizing simply click on the Save changes button.
16. Customize the WooCommerce Settings- Part5 (Payments)
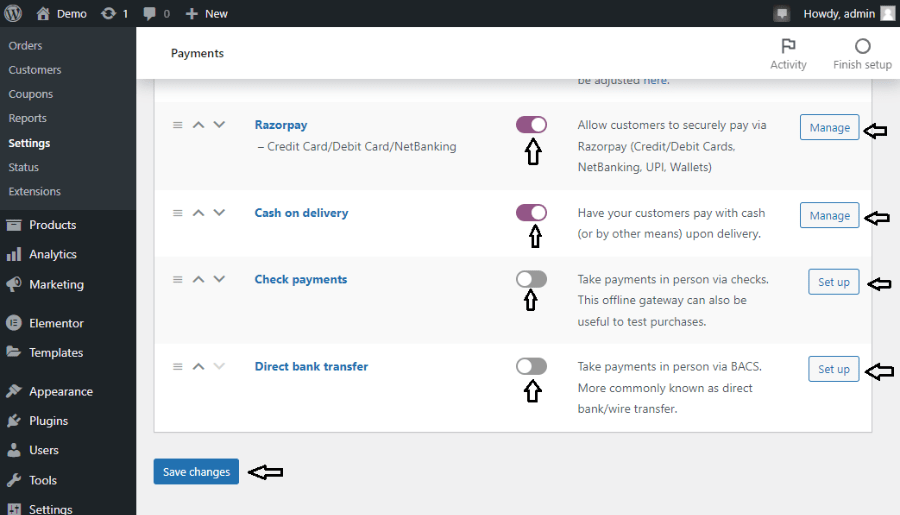
Now, payment options we can able to integrate here inside this Payment settings. We can able to integrate different Razorpay, Cash on delivery, Check payments, Skrills, Direct bank transfer, and many, etc. There are different ways of payment integration, you can able to choose any options. Simply, you need to enable the particular payment option first and then you need to manage that particular payment method by clicking simply on the Set up button, as shown in the image too.
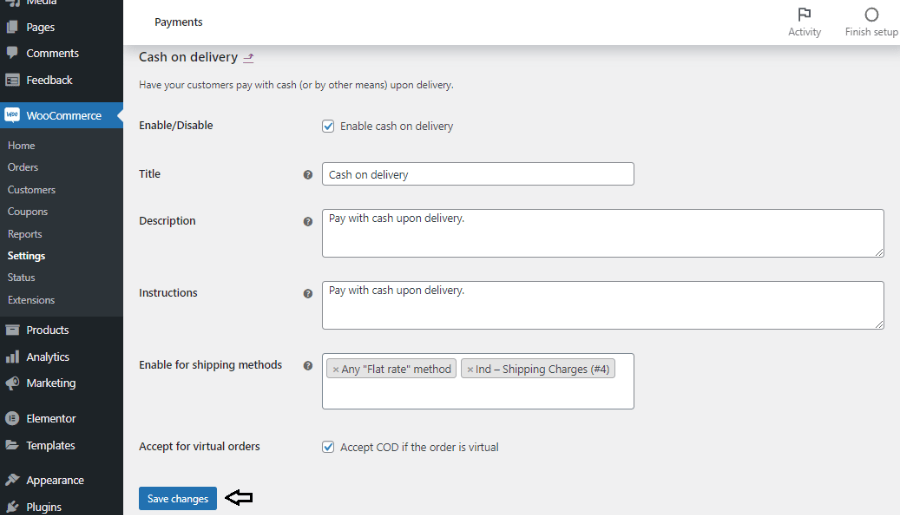
You can able to activate skrill, direct deposition in the bank, PayPal which we will be also learning in our Paypal Payment Integration Inside WordPress build e-commerce sites post and other payment methods too. For every particular payment option, you also need to enable it for different or all shipping methods, which you can able to customize the settings after enabling any payment option and clicking on the Set up button.
17. Customize the WooCommerce Settings- Part6 (Accounts & Privacy)
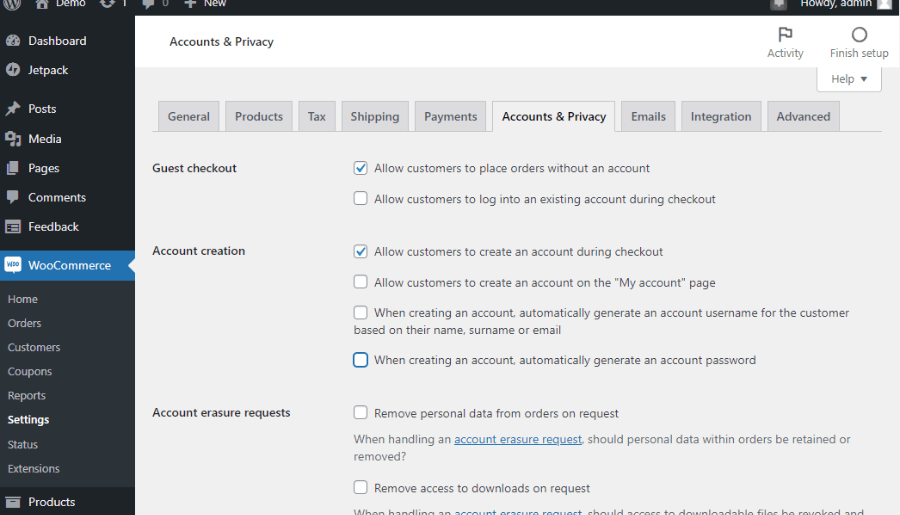
After setting the Payment options, we need to customize now the Accounts & Privacy settings. Here we can able to enable the Guest checkout settings, account creation, or deletion of guests.
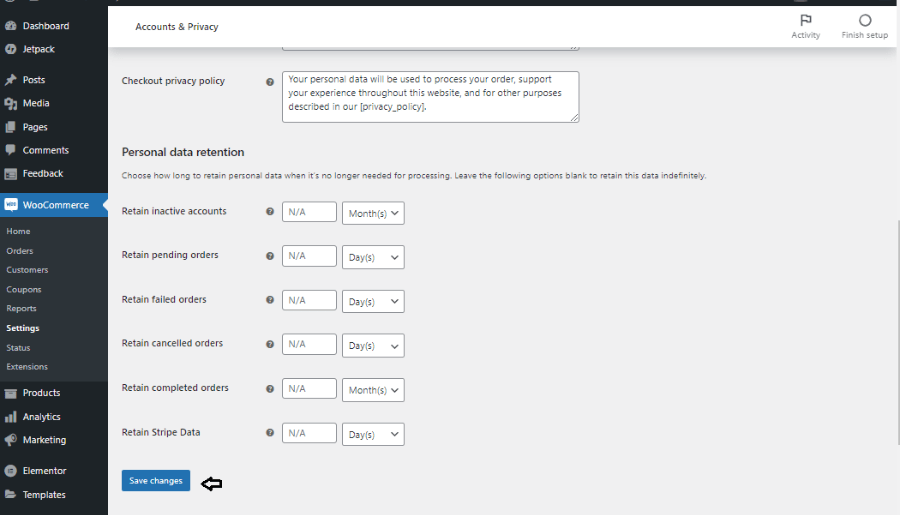
Also, we can able to customize the records of retained inactive accounts, retained pending or failed or canceled, completed orders of our users, etc.
18. Customize the WooCommerce Settings- Part7 (Emails)
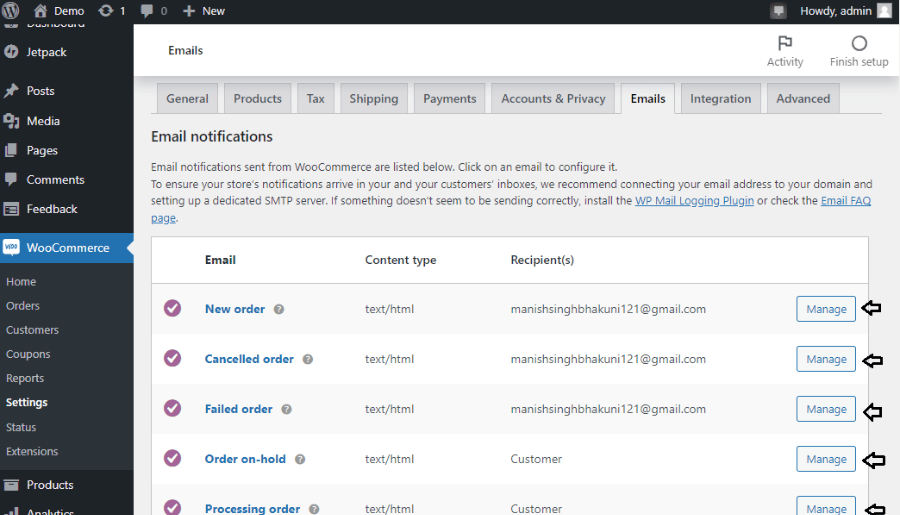
Here we can able to customize our email notification settings, like which email will get notified for a new order, canceled, failed, hold and processing orders, etc. For any edition, we can click on the Manage button.
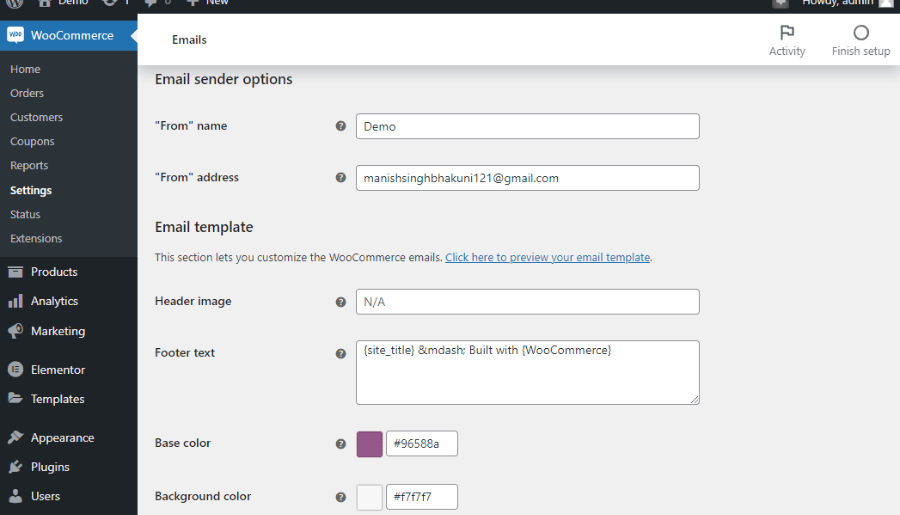
Also, it gives us the flexibility of customizing the email sending options. We can able to add header images, particular footer text, color, and other basic settings too here.
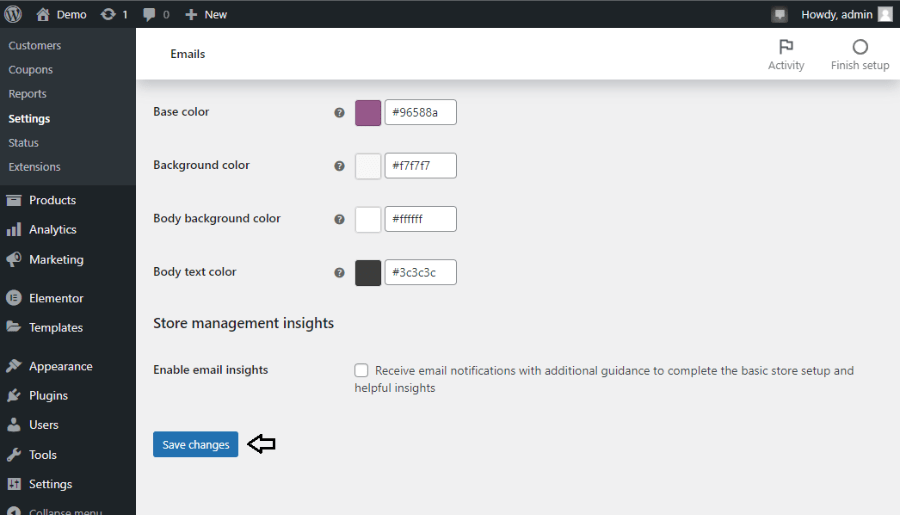
Body, text, background, and base color are also we can able to customize here. After doing the required changes simply click on the Save changes button.
19. Customize the WooCommerce Settings- Part8 (Integration)
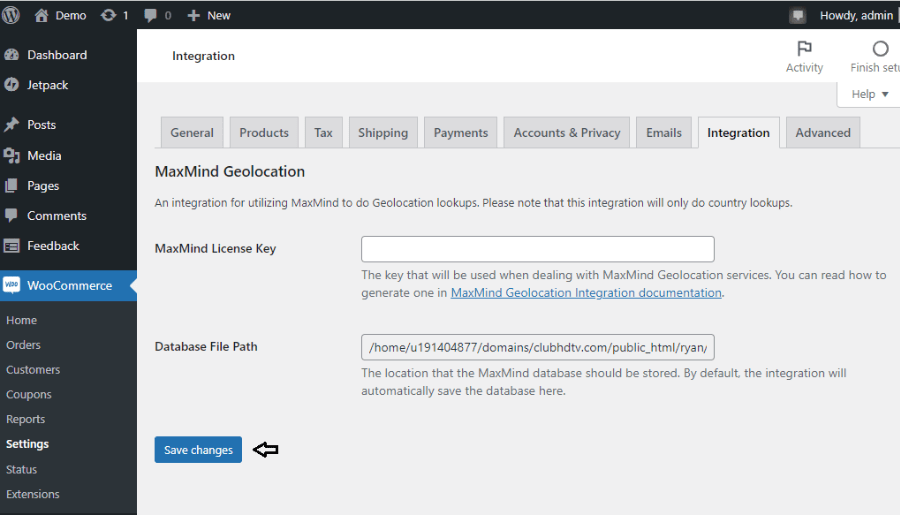
A Maxmind location is a tool, API, or application that is used to detect online frauds and locate online visitors. Inside the Integration settings, you can enable the Maxmind Geolocation. And for that simply click on the ‘Maxmind Geolocation Integration documentation’ link and after successful registration, you will be getting the particular License Key which you need to feed inside the Maxmind license key box. And then simply click on the Save changes button.
20. Customize the WooCommerce Settings- Part9 (Advanced)
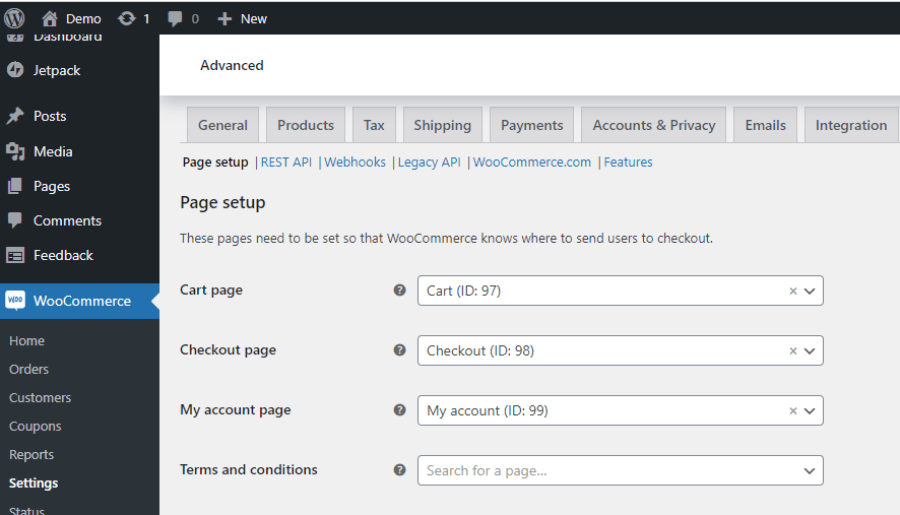
Here, you can able to edit your advanced page setup settings. It has its default page setup data like a particular page for cart, checkout, my account, terms, etc.
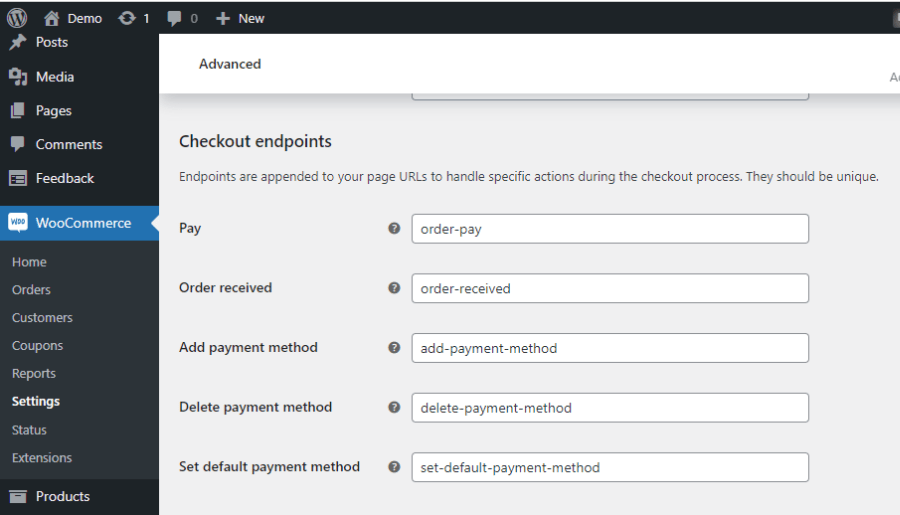
Also, checkout endpoints page URLs, you can able to check or customize them here.
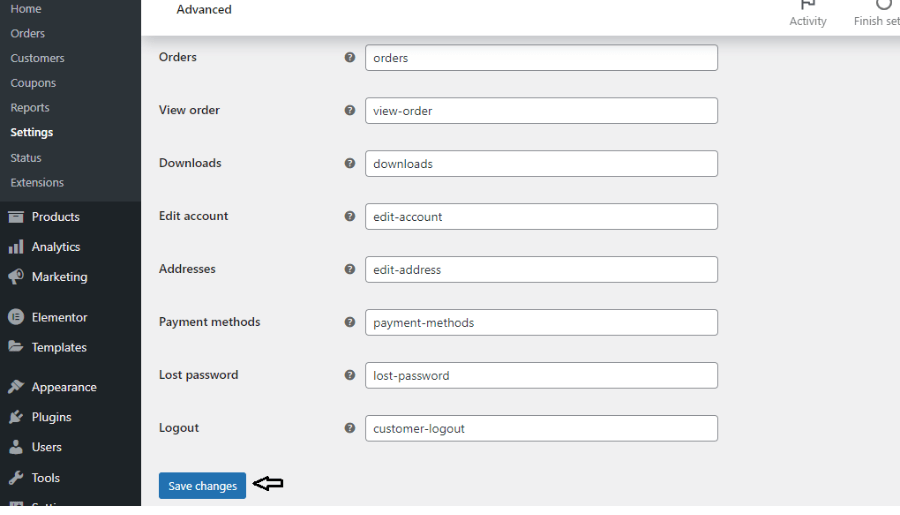
But I recommend you leave all the page setup settings for the default one and simply click on the Save changes button.
21. Now check the payment process by placing a dummy order
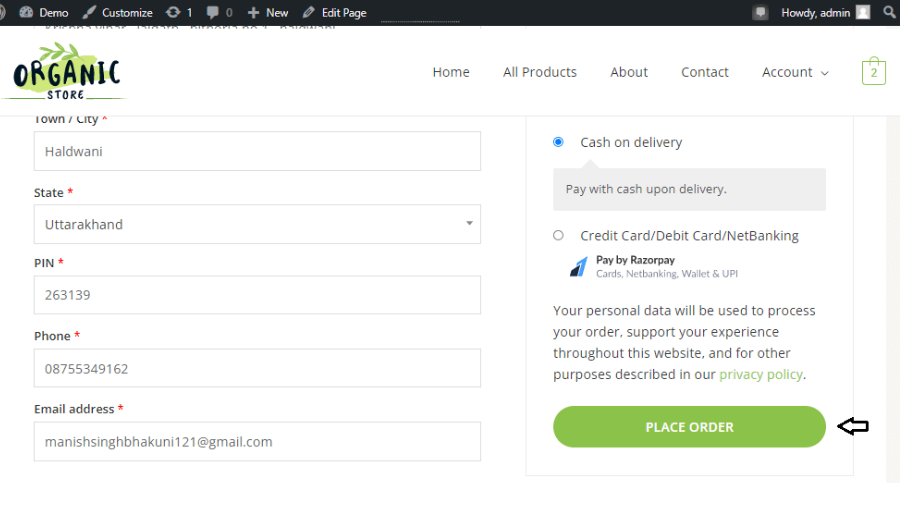
Now your all WooCommerce settings have been done. Simply you need to come back to your official website and place any dummy order. And if all goes well with the payment process and placing successful orders then congratulations you have successfully designed your full-fledged working e-commerce websites through WooCommerce.
22. After placing the dummy order check the WooCommerce Orders option
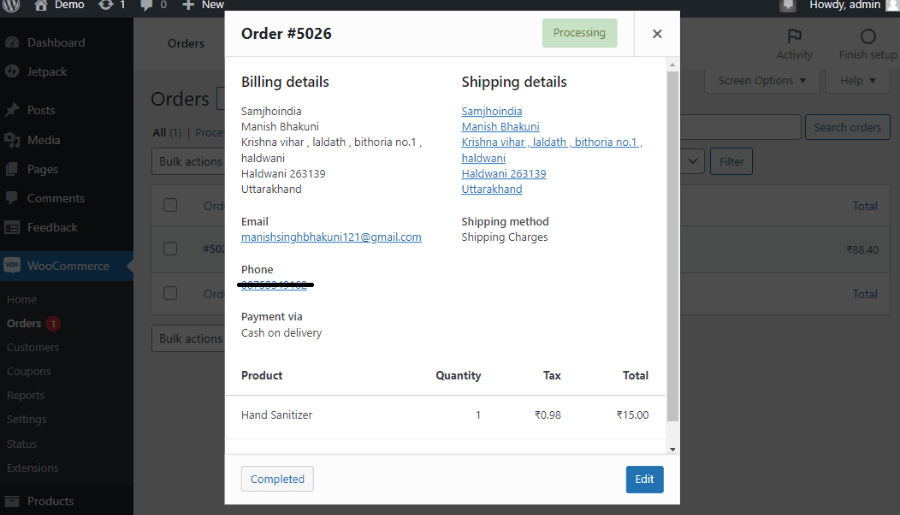
After placing the dummy order now you need to track your order details, which you will be getting inside WooCommerce > Orders. If all the details you get are correct then this means we have successfully completed all the steps.
Conclusion-
Here we have talked about the WooCommerce full settings. Also, we had learned how we can enable different payment methods inside our store or site. We will be talking also about PayPal settings inside the RazorPay, in our PayPal integration inside the RazorPay settings post. Also, we will be knowing about the Products settings of WooCommerce in our Product WooCommerce settings for any e-Commerce store in WordPress. So we have enough things to read and understand which is a must to stand out from the others.
For any type of query and suggestions, feel free to ask me in the comments.


