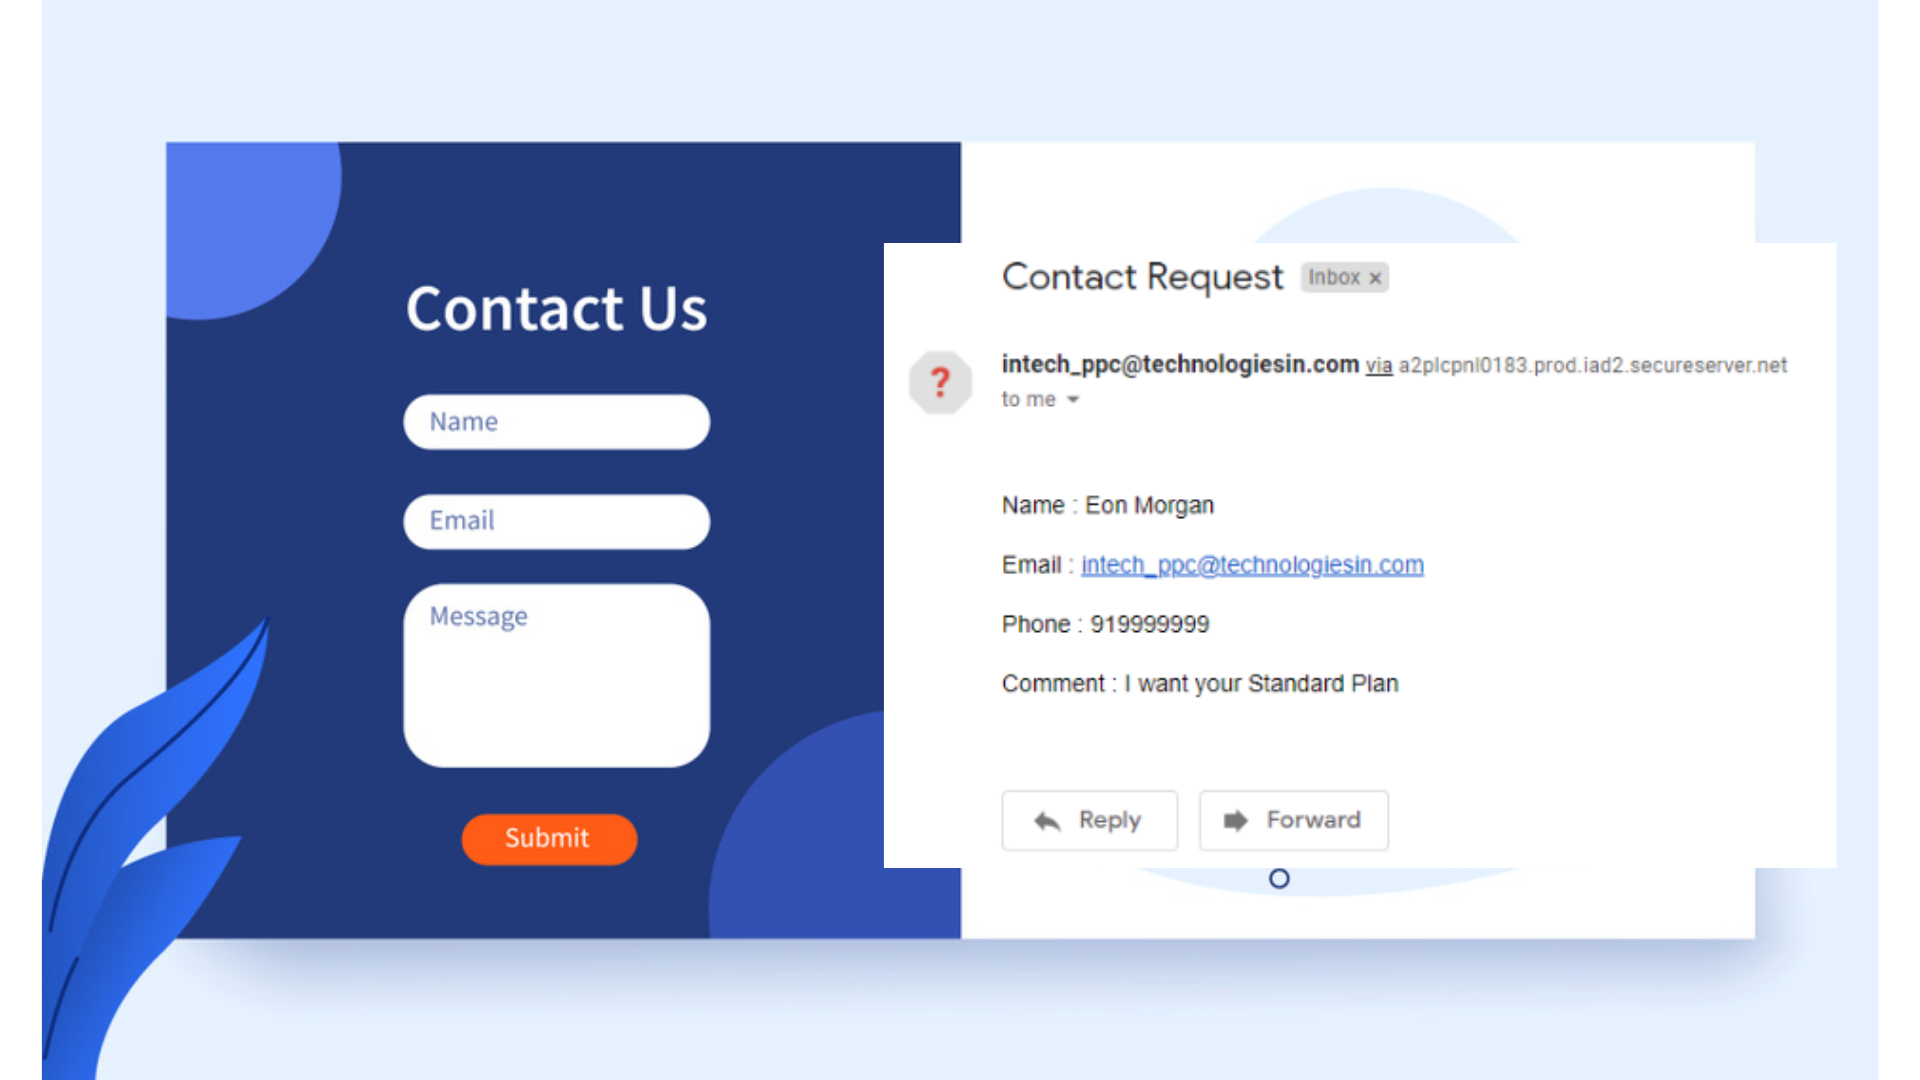
“As, 80-90% websites have the contact forms inside them, where any user when fills-up the form, automatically his/her asked details inside the form, falls inside any designated creator mail address. Also, through the contact form, the creator can directly communicate with their viewers or readers, which also helps in building a positive impact or repo in front of his viewers or readers. The creator can solve the asked queries and reply to them via mail and etc.
In our previous post, I have described the multiple ways by which we can able to design the contact form using HTML, CSS, Bootstrap & JavaScript, and our contact form we are activating using the PHP language, with source code we have explained everything in our following posts:-
- 100% Working Contact Form Through Custom Code (Part-1)– here are the user details, which we are getting inside the tabular format inside our mail.
- 100% Working Contact Form Through Custom Code (Part-2)– here are the user details, which we are getting inside the paragraphing format inside our mail.
- 100% Working Contact Form With Multiple Input Tags Through Custom Code (Part-3)– here are multiple input tags, that I have included inside the form and then get all input field values inside the mail.
Also, if you have any issues in installing the WordPress inside the server, then you can visit our How to install WordPress inside the hosting server post, where you can successfully install the WordPress in the cost-efficient hosting plan. You can purchase any hosting plan, and know the Pros and cons of different hosting providing companies, then must visit our- Pros & Cons Of Different Web-Hosting Companies.
But for now, if you want to learn WordPress and want it to run on your local server or computer, then must visit our- How to Install WordPress In Your Local Server post.
But, today we will be learning here the steps by which we can successfully import our beautiful form with full active functionality inside the WordPress. And to achieve this sort of working contact form, we are using the popular Contact Form 7 plugin.
This Contact Form 7 plugin is one of the trusted and most popular plugins in WordPress. Here customization of the form plus the mailing functionality all are been so easy to propagate. Just, by doing the nominal customization, we can get our fully functioning contact form.” Let’s understand all aspects:-
1. Go to the WordPress dashboard and access the Plugins section
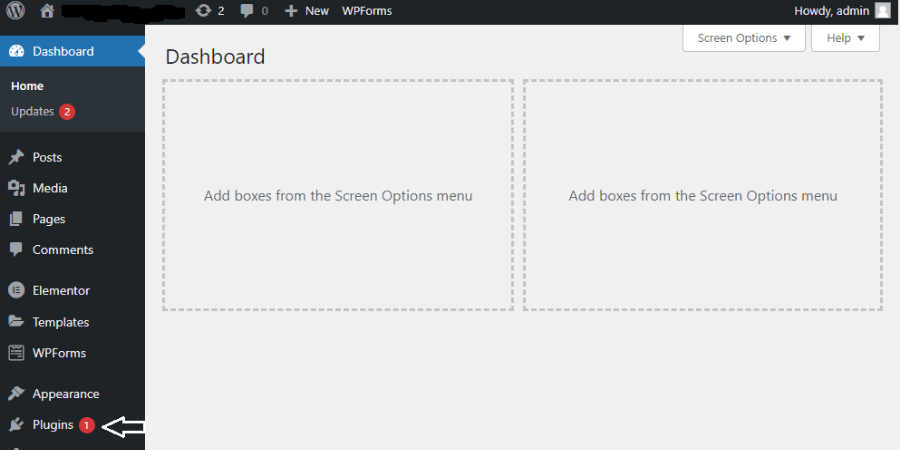
Before everything, we need to add a plugin named “Contact Form 7”. And to add this plugin, go to the main WordPress dashboard and search for the Plugins section, which you can find on the left sidebar, and click over it.
2. Click on the Add New button to successfully install the new plugin inside
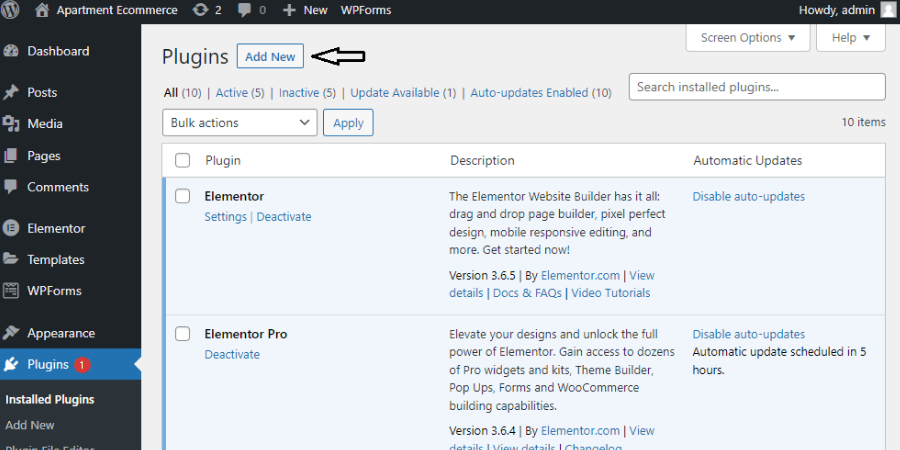
Inside the Plugins dashboard, now you need to click simply on the Add New button to add a new plugin inside the site.
3. Search for the Contact Form 7 Plugin and install it
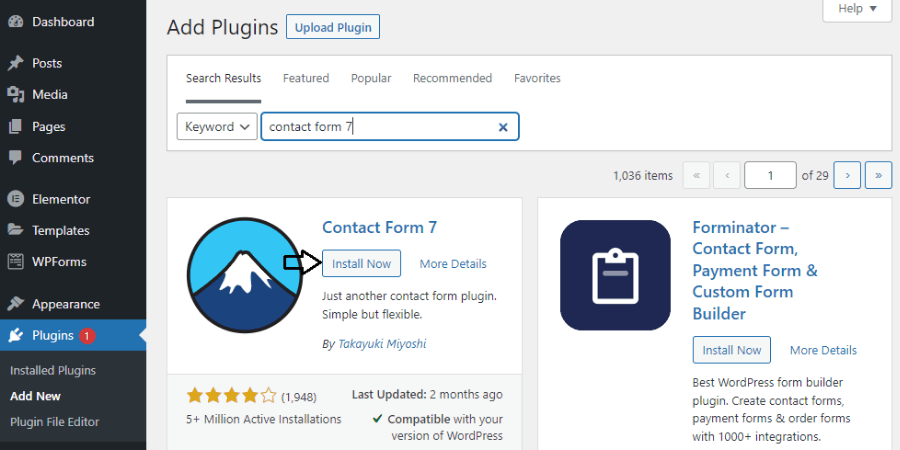
As soon as you click on the Add New button, you will be accessing different plugin search result pages. , inside the search bar, you need to type- ‘Contact Form 7’, as shown in the above image. Then, click on the Install Now button, to install or add this plugin.
4. Now, activate the successfully installed Contact Form 7 plugin
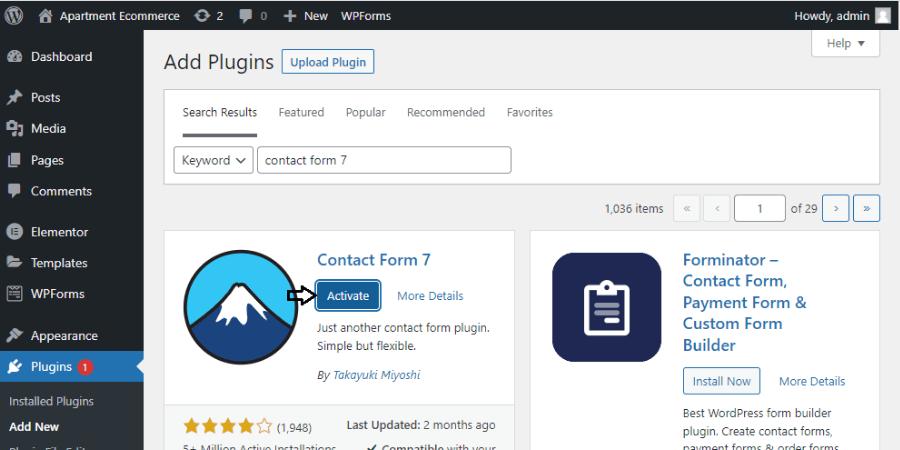
After the successful installation of this plugin, now you need to activate the plugin, so it can play its role. After clicking on the Activate button, return back to your WordPress dashboard.
5. Access the Contact menu or settings inside the WordPress dashboard
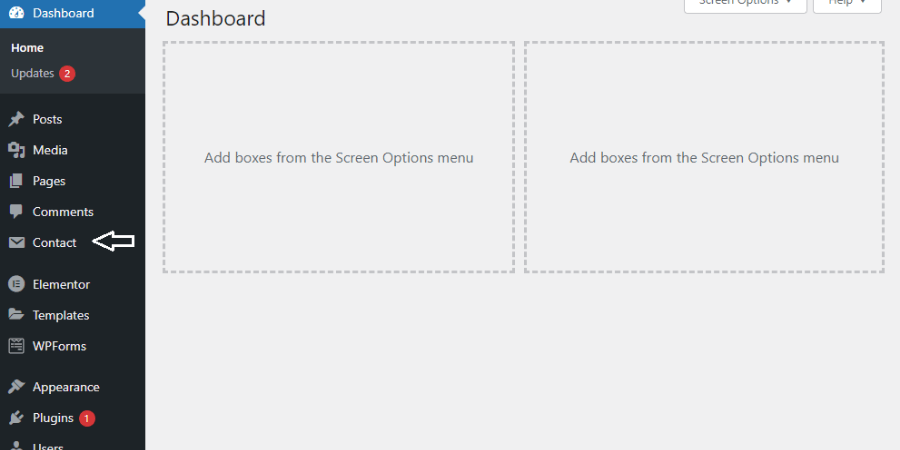
As, soon as your Contact Form 7 plugin is installed and activated, automatically you will get a Contact component included inside your WordPress dashboard, as shown in the image too. You need to click over it.
6. Click on the Add New button to create the new Contact Form
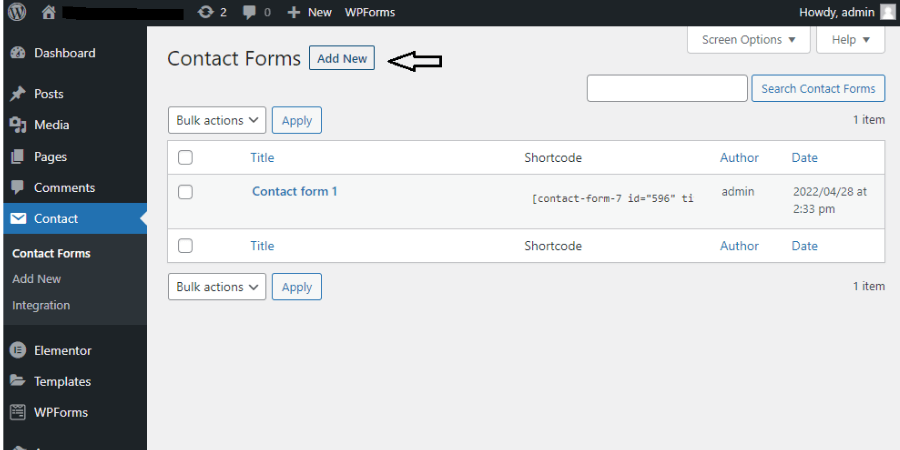
Now click on the Add New button to add and further embed it inside the place, where you need to showcase your contact form.
7. Customize your Form- title and input fields
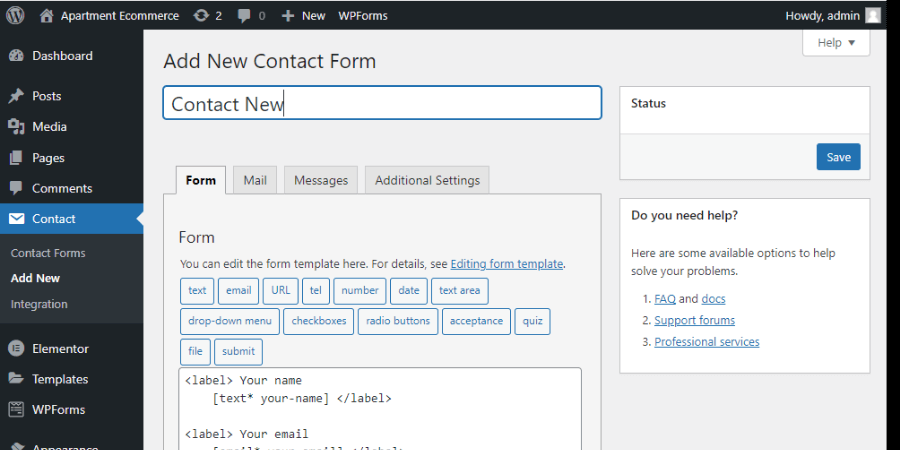
Here, you need to customize your contact form now. Place a proper title very first. Then below the title containing the box, you will get four tabs- Form, Mail, Messages & Additional Settings. Click on the Form tab or by default it is been clicked and the form code you can able to check too (<label>Your name [text* your-name] </label>).
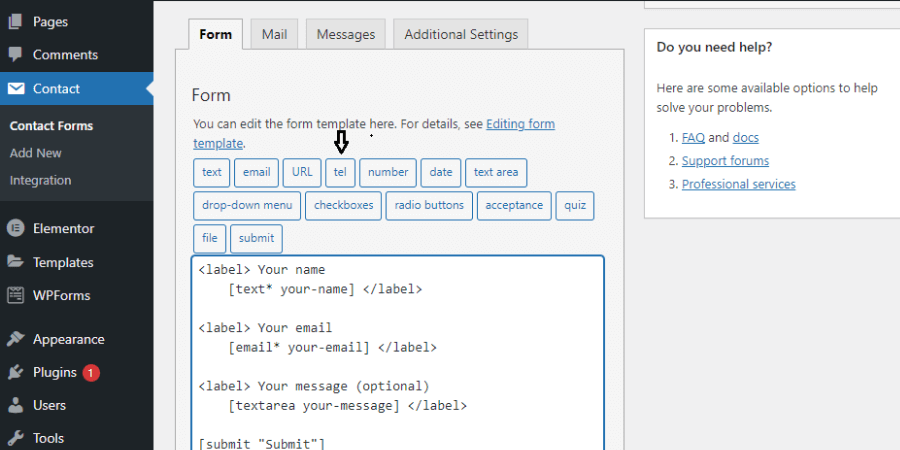
By default Contact Form 7 has some default input fields, but if in case you want to add more input fields, you can very well embed it from the above badges or buttons that have text like- text, email, URL, tel, number, and etc.
Here I am showcasing to you one way- how you can add an input field (telephone or number) inside the form, and you can embed other input fields, same like it. So the very first step is to click on the badge or button above-containing tel.
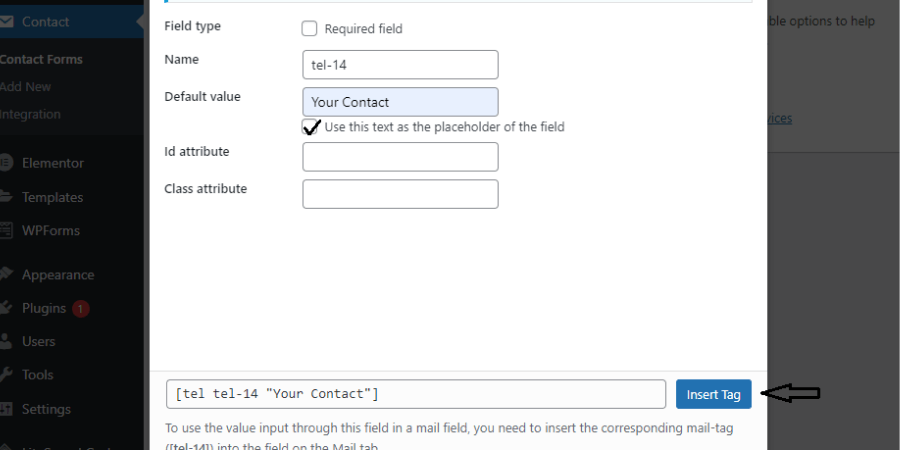
As, soon as you click on it a popup box will come out, asking you some details like-
- Field type– if you check on this box then it will be a required field, where the user needs to fill up this field before submitting the form.
- Name– by default they generate the field name, you can keep that or can edit this name as per your choice.
- Default value– it will keep your input field value, you can edit it too and check the below checkbox if you want this value to be set this value as a placeholder value.
- Id attribute- you can edit this id attribute too or by default you can keep the id attribute value.
- Class attribute- you can edit this class attribute too or by default you can keep the class attribute value.
Now to embed this field, you need to insert the tag, so click on the Insert Tag button.
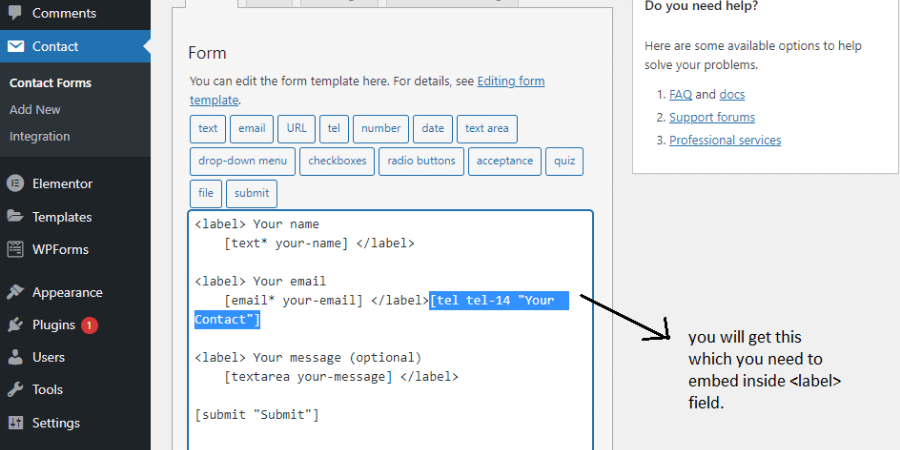
As, soon as you click on the Insert Tag, automatically your field tag, will appear inside the form, as shown in the image too.
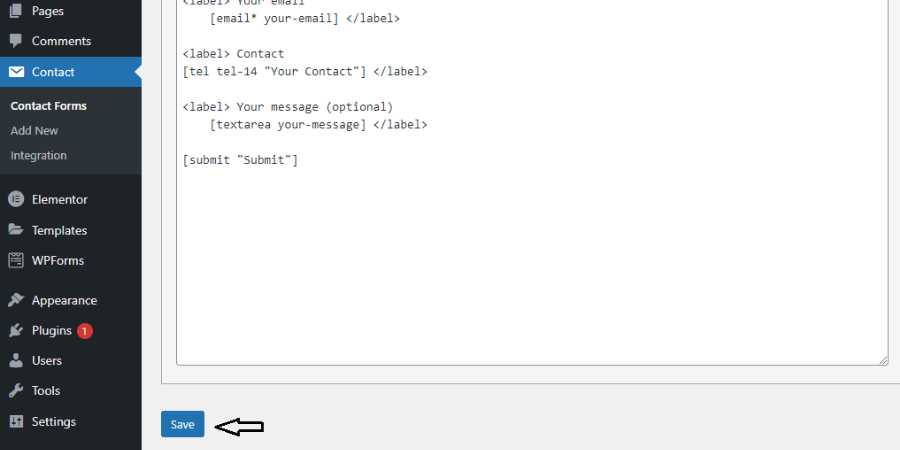
You can embed this field tag properly inside the <label>…</label> tag. Take the idea from another field and then click on the Save button.
8. Customize your Form mail settings
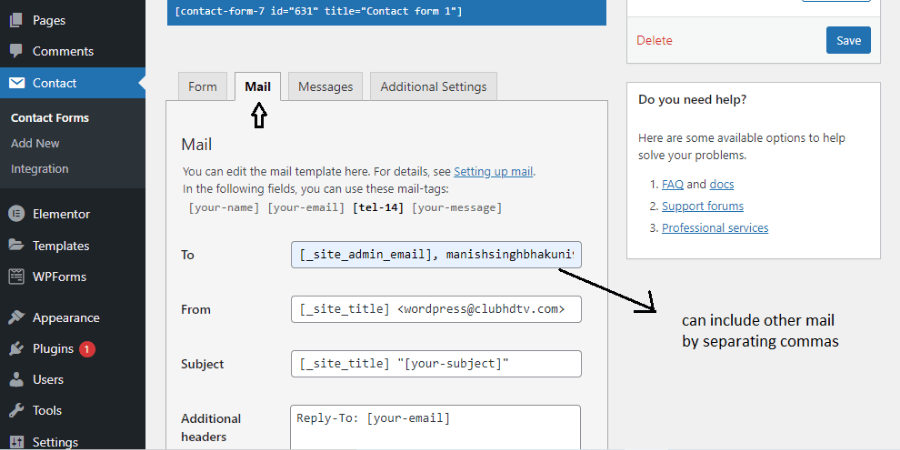
Form customization, we have done it till now. Now we need to customize the form mail settings. Besides the Form tab, you can able to access the Mail settings, and click over it.
Then, you will be getting the fields like- To, From, Subject, Additional headers, etc., the same which you get when you send through mail. So simply inside-
- To field- designate your mail address here, where you want your form details submitted by user drops. You can also include multiple mail IDs here separated by (,).
- From field- it defines that mail address from where the mail notification comes from.
- Subject field- the single line of text that you can showcase, as your email notification subject line.
- Additional headers field- We use this Additional Headers field to add Cc or Bcc headers to your email.
- Message Body field- it contains all the values or information added by any user.
- File attachments field- optional one, if you want to embed files.
- Mail(2) (Use Mail checkbox) field- you can opt for this option too, as here it works like an autoresponder, so whenever any user successfully submits the form, with proper mail, message body, and headers the mail responded back.
But might every other user filling form have different queries and you can’t respond to the same messages to every user. So, it’s better to uncheck this box, but the rest is your choice.
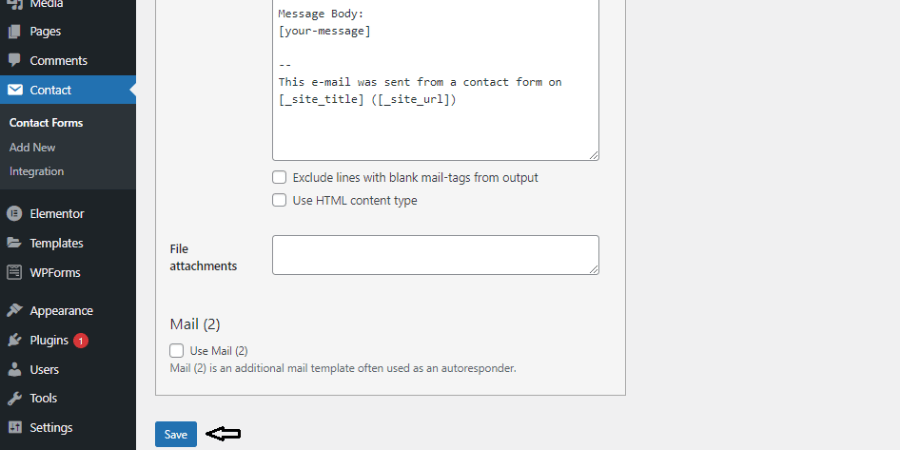
After, customizing everything inside the Mail tab, click on the Save button and move further on to the next step.
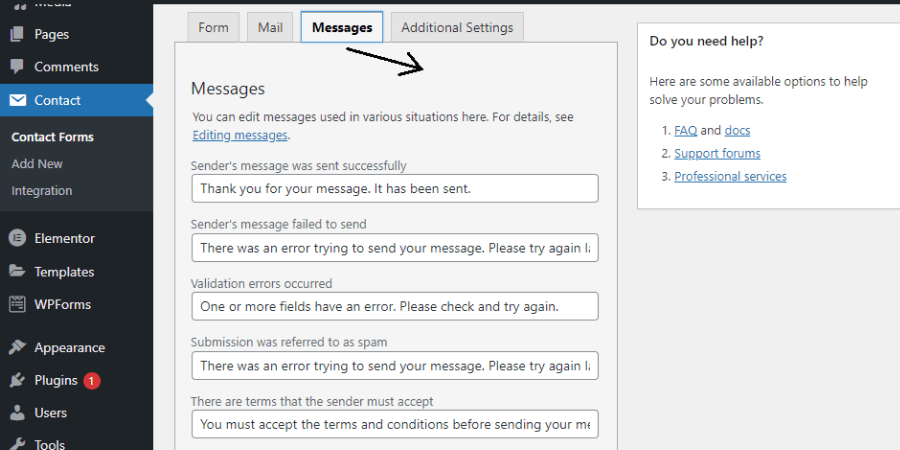
Now, it’s time to customize your Messages settings. Whenever any user fills the form and clicks on the submit button, how is he gonna know whether his/her query has been sent successfully or not? So through this Messages tab, we can validate and show the success or error message to the user as soon as he clicks on the Submit button.
- If all goes well, and the form is submitted successfully, then the user will get the success message- “Thank you for your message. It has been sent. You can customize the success text too by just re-editing the success message text.
- If due to any reason like- Server issue, not matched with the input asked values, then the user will get the error message. By default during the fail process, the user will get the error message- “There was an error trying to send your message. Please try again later.” You can customize it as well.
- If the form validation error occurs it will showcase the validation error saying “One or more fields have an error. Please check and try again.”
The above-mentioned success or error message is the most important one, which you must need to have.
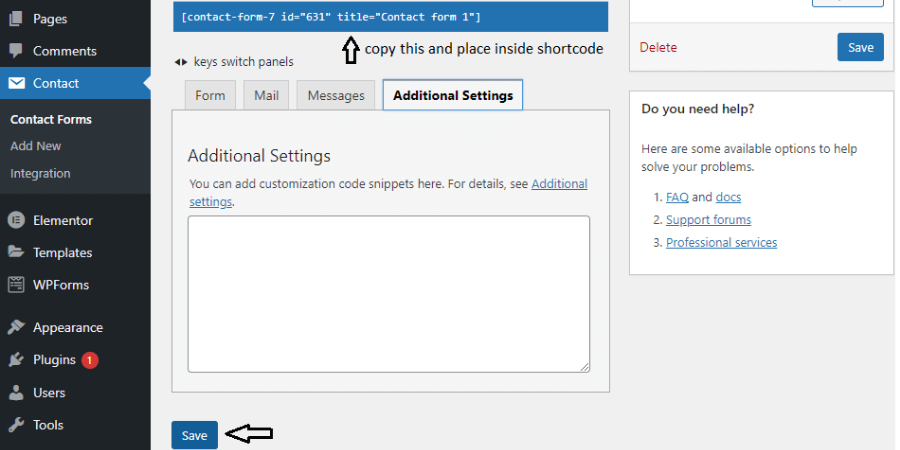
You can also able to add customized code snippets in a specific format to your mail. As it is an optional setting if you want then only add the code snippets else click on the Save button. Also, after configuring the whole Contact Form 7 settings, you can able to notice the shortcode of your newly designed contact form, you need to copy that.
9. Inside the Elementor paste the contact form 7 shortcode
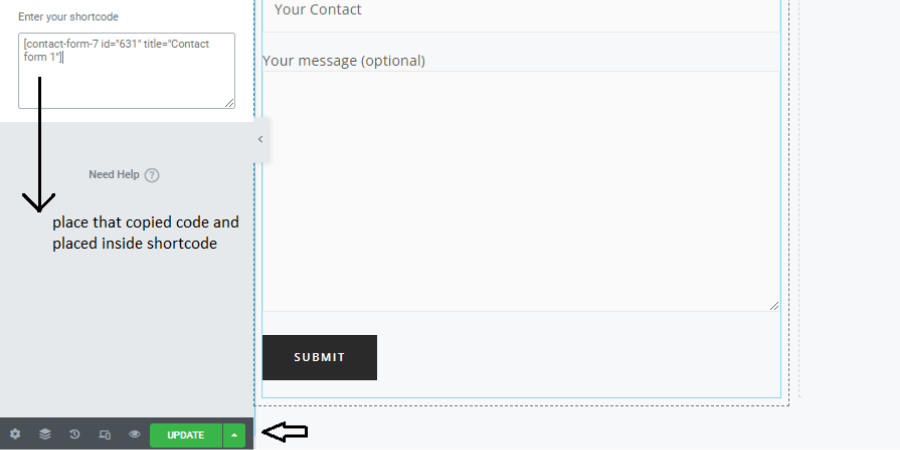
Now inside any web page builder, place your copied shortcode. In my case, I am using Elementor, which is one of the most popular and easy website WordPress page builder plugins. Inside your desired location, you need to place the Shortcode widget and then place the Contact Form 7 shortcode.
As soon as you place the shortcode, automatically your form appears in that particular location.
10. Test your designed contact form
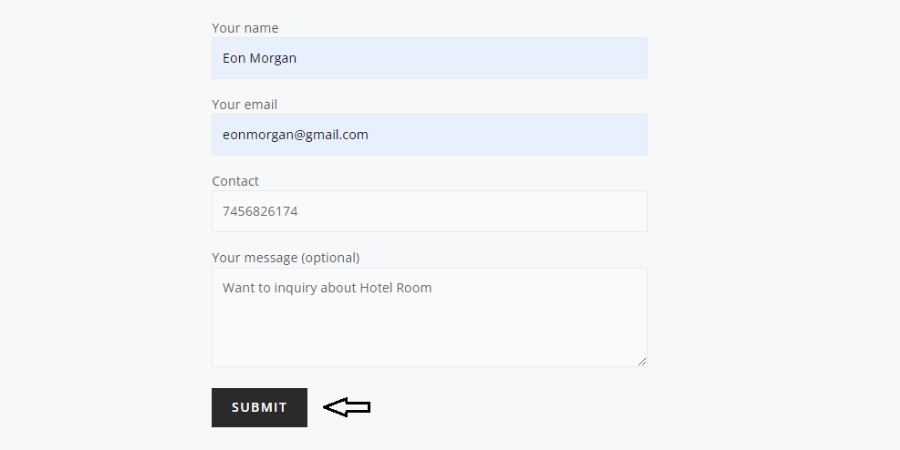
Now, you have designed the full-fledged working contact form. Now, it’s time to test it out. So come inside your official website, find the form and fill in all the required fields and then click on the SUBMIT button.
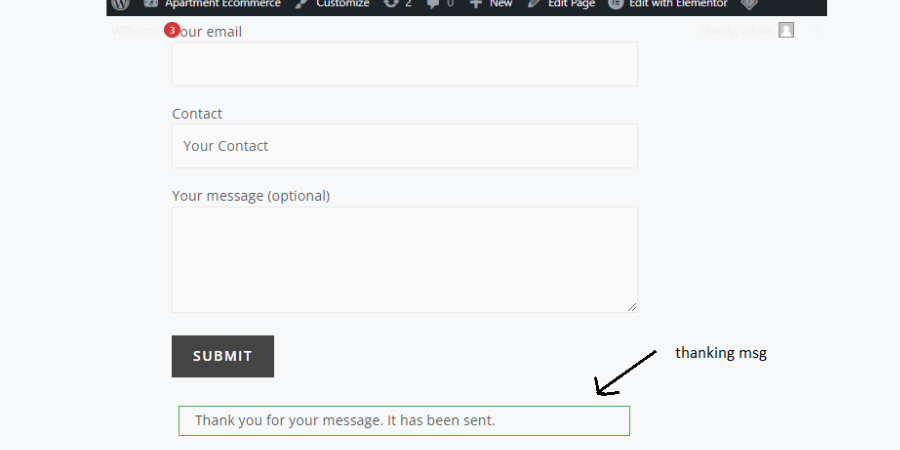
If your form was successfully submitted, then check for the success or error message. If the form is submitted successfully then it showcases the success message else it will show the error message.
11. Now check your designated mail address
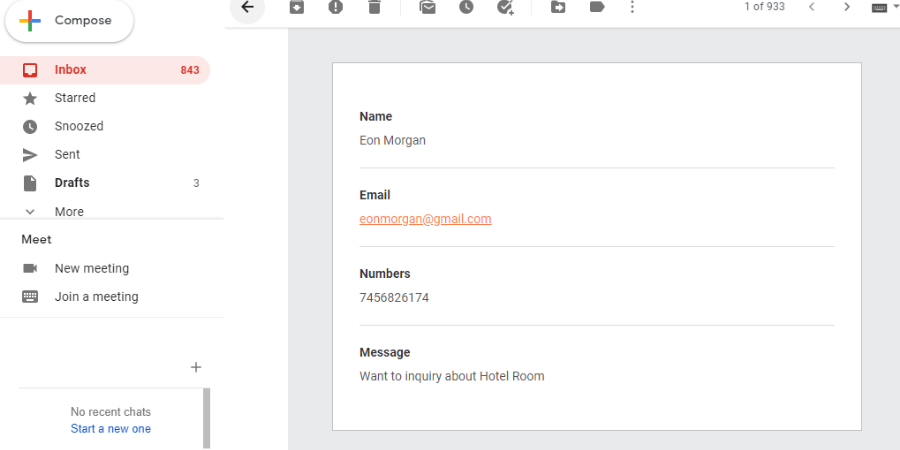
Now here comes your final stage, where your form-filled details must need to drop inside your designated mail address. Go to your designated mail address, which you have also included above inside the Mail tab. If everything seems fine then you will be definitely getting all the user field values, as is shown in the image too.
Conclusion-
As we have understood above- how to successfully validate and activate your contact form inside the WordPress using the Contact Form 7 plugin. If you have followed all the above steps, which I have mentioned then guaranteed your form activated. But if in case, you are getting any sort of problem then feel free to comment to us below.
The step-by-step whole setup of the Contact Form 7 plugin is been explained above, but if in case your contact form is still not able to send the mail, because of your hosting then you can visit our this blog post, How to Fix the issue of WordPress contact form not sending mails.
Also, you can visit our other post where we have thoroughly explained the contact form set up or activation settings by using the WPForms plugin. Visit inside this link- https://babacoder.com/blog/working-contact-form-through-wpforms-plugin-in-wordpress/, and stay tuned and be with us to learn this most challenging and beautiful coding journey.


